Overview
Apply Bookmarks to Pages creates a bookmark that targets the current page. You can type a title manually, use selected text from the PDF, or insert dynamic variables such as the page number or page label. The dialog is modeless, so it stays open while you navigate between pages and add multiple bookmarks in a single session.
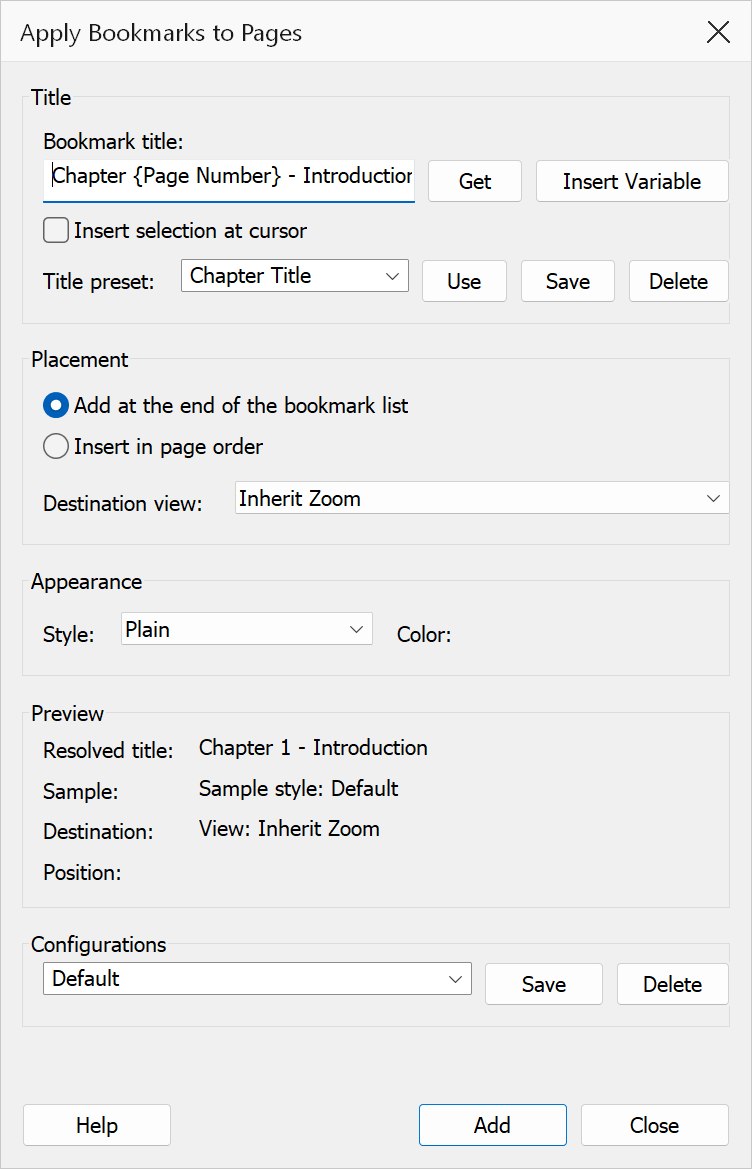
How to use
- Open a PDF and navigate to the page you want to bookmark.
- Optionally select text on the page to use as the bookmark title.
- Go to Plug-Ins > Bookmarks > Apply Bookmarks to Pages.
- Enter or edit the bookmark title. Use the Get button to pull selected text from the document, or choose a title preset from the dropdown (you can also type a new preset into the dropdown and click Save).
- Set the placement, style, color, and destination view options.
- Check the Preview panel — it names the page the bookmark will point at and where it will land in the bookmark list.
- Click Add to create the bookmark.
- The dialog stays open. Navigate to the next page and repeat; every other setting is
kept. Click Close when you are done.
A plain title is cleared after each Add, so a second Add cannot silently create a duplicate. A title containing a variable is kept and selected instead, because it resolves differently on every page — press Add again on the next page to reuse it.
Title options
| Option | Description |
|---|---|
| Bookmark title | The text that will appear as the bookmark name. If text was highlighted in the PDF before opening the dialog, it is pre-filled automatically. Titles may be in any language — Cyrillic, Greek, CJK or accented text is stored as full Unicode, whether typed, taken from a text selection, or loaded from a saved preset. |
| Get | Reads the currently selected text from the PDF and places it into the title field. If Insert selection at cursor is enabled, the text is inserted at the cursor position instead of replacing the entire title. This also updates the selection rectangle used by the Fit Rectangle destination view. |
| Insert Variable | Opens a menu of the variables you can use in a title, and places the one you choose at
the cursor position:
|
| Insert selection at cursor | When enabled, the Get button inserts text at the cursor position rather than replacing the entire title. |
| Title preset | An editable dropdown of previously saved title templates. Picking one from the list puts
it straight into the Bookmark title field; you can also type a preset
directly into the box.
|
The older variable spellings {Page Number} and {Page Label} are
still recognised, so title presets saved with earlier versions keep working.
Formatting options
| Option | Description |
|---|---|
| Style | Sets the bookmark text style. Choices are Plain, Bold, Italic, or Bold + Italic. |
| Color | Opens a color picker to choose a custom color for the bookmark text. Defaults to black. |
Destination view
| Option | Description |
|---|---|
| Inherit Zoom | Uses XYZ with null zoom so the viewer keeps its current zoom level when navigating to the bookmark. |
| Fit Page | Displays the entire page in the viewer window. |
| Fit Width | Fits the page width to the viewer window. |
| Fit Height | Fits the page height to the viewer window. |
| Fit Visible | Fits the visible content bounds to the viewer window. |
| Fit Rectangle | Targets the area you selected on the page. This needs a text selection: select text before opening the dialog, or press Get while it is open. With no selection the setting falls back to Fit Page. |
Placement options
| Option | Description |
|---|---|
| Add at the end of the bookmark list | Appends the new bookmark as the last top-level entry, whatever page it points at. This is the default. |
| Insert in page order | Places the new bookmark next to the existing bookmark nearest its page, so the list stays in page order. The Position line in the Preview panel names the bookmark it will be placed after (or before), so you can check before adding. |
Preview
The Preview panel shows what will happen when you press Add, and updates as you change options — including as you navigate the document:
| Line | Shows |
|---|---|
| Resolved title | The title with its variables expanded for the current page. This is exactly the text that will be written to the bookmark. |
| Sample | A sample rendered in the selected style and colour. |
| Destination | The page the bookmark will point at (with its page label, if the document has one) and the destination view that will be used. |
| Position | Where the bookmark will land in the existing bookmark list. |
Below the panel, a status line reports the result of the last bookmark you added.
Tip
Save frequently used title templates (e.g. Chapter {page}) with the
Save button so you can reuse them quickly across sessions. Because the
variable is stored rather than its value, one preset works on every page.
Note
The Add button is disabled until the title field contains text. If no text is selected in the PDF, you must type a title manually.
Note
The bookmark is created on whichever page Acrobat is showing when you press Add — not the page you were on when you opened the dialog. The Destination line in the Preview panel always names the page that will be used.