Mapsoft Impress Pro User Guide
Table of Contents
Introduction
Mapsoft Impress Pro is a plug-in for use with Adobe Acrobat Standard or Adobe Acrobat Professional . Impress Pro allows you to stamp the pages of PDF documents with impressions (text stamps). You can stamp single files with either single or multiple impressions, or you can stamp more than one file at the same time with one or more impressions. You can save a named impression and re-use it again and again.

In addition to specifying the actual text for an impression, which can be anything you want, Impress Pro allows you to specify its:
q Position
q Alignment
q Appearance
q Colour
q Page Range
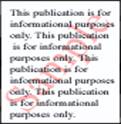
Impressions can be stamped above any existing text in your PDF documents or as a watermark. Watermarks appear on a layer below the documents existing text and images, as in the following example:

Text placed as an overlay above a documents existing material is often used for headers and footers, page numbering, date information etc. Variables can be set to define much of the information, (such as page numbering, total number of pages and current date/time), that is typically found here. Text placed in the foreground can also be transparent, so allowing you to still see the text below it.
| Transparency is not supported for versions of Acrobat pre-dating Acrobat Version 5. You will probably still be able to open documents stamped with transparent text under |
Sample impressions, for example Confidential and Draft are supplied with Impress Pro. You can use these sample impressions without any change, or you can modify them if you wish.
Once a file has been marked with an impression or image, that impression or image will be permanently embedded within that file when that file is saved. You will NOT be able to subsequently remove any impressions from a file once it has been saved other than manually with the Acrobat touchup object tool.
| You are thus strongly advised to take backups of your files before running Impress Pro over them |
In addition to offering you the facility to stamp your PDF files with text impressions and Images, Impress Pro also allows you to set
various attributes for your PDF documents, namely:
q Document information Such as, Title, Subject or Author
q Security options Such as the password to open a document
q PDF file open options Such as the initial view and the position of the window containing the PDF file
You can set any (or all) of the above document attributes when stamping a file with an impression. However, these attributes can also be set completely independently from marking an impression, so giving you the ability to use Impress Pro just for setting document
attributes.
New Features in This Version of Impress Pro
The following list identifies the new features that were added for Version 3 of Impress Pro:
q Modeless Operation.
q The main dialog is now modeless which means that functions within Acrobat are not disabled when the main Impress Pro window is open. This also makes the viewing of prototype impressions and Images much easier to preview.
q Addition of more standard placements including Horizontal centered, Vertical centered and Centered
q The Security tab has now been updated for more extensive security and more secure files
q Direct access from the user interface to the help and Mapsoft web site.
The following list identifies the new features that were added for Version 2/2.1 of Impress Pro:
q Support for any installed system font
In addition to the base Acrobat fonts already supported by Version 1 of Impress
Pro, all fonts available on your system can now be used in an impression. If you use a font that is not one of the ones already found within the file currently being stamped, that font will automatically be embedded into that file when you stamp it with that impression. See Controlling an Impression’s Appearance.
q Preview Feature
When working with the current document a new Quick Apply button is available which allows you to stamp your file with your impression more quickly than you could by going through to the Apply tab in the Impress Pro dialog box. When used in conjunction with the new Quick Undo button, see below, this effectively offers you a preview facility allowing you to quickly stamp an
impression and then remove it if you decide its effects are not as you would wish. See Applying Impressions.
q Quick Undo
Similarly, a new Quick Undo facility is also available, allowing you to quickly undo the last impression(s) applied.
You can only do this before saving the relevant file(s). See Applying Impressions.
q Tool Tips
Tool Tips are now available for many of the buttons and fields within Impress Pro. Simply linger with the mouse over the appropriate button or field to display the text of its associated tip.
q Drag & Drop
You can use Drag & Drop to select the files or directories you wish to stamp with your impression. This feature is only applicable if working with multiple files. See Selecting Multiple Documents.
q Selection of all PDF files within a Directory
It is now possible to select an entire directory to work with. All PDF files within that directory, provided they have an extension of PDF, will be selected automatically by Impress Pro. See Selecting Multiple Documents.
q Serial Numbers
Support added for stamping serial numbers onto PDF file(s). These serial numbers can be traditional serial numbers, or they can be revision/version numbers. This feature also allows you to stamp an unbroken sequence of page numbers across multiple files. See Including Variable Data.
q Bates Numbering
Support for Bates numbering has been added. This is a system of numbering pages commonly used in legal documents. Page numbers consist of six characters, up to a maximum of 999999. For example page 34 would be 000034 when using Bates numbering:

q Roman Numerals
Support for numbering pages with Roman numerals has also been added. Numbering pages using Roman numerals is commonly used in documents Introductions and Appendices. Pages can be numbered up to a maximum of 3999 using these symbols as many fonts do not support the extra lines above characters required to represent larger numbers. See Page Numbering.
q Selection of special fields via the user interface
A number of special fields are available to allow variables, such as date or time information, to be stamped on your file(s). In previous versions of Impress Pro these fields had to be entered manually, but now their selection process has been streamlined so they can all be selected via new Impress Pro menu options. See Including Variable Data.
q New variables added
Various new variables have been added, allowing you to stamp your file(s) with the current file name and various document information fields. See Including Variable Data..
q Rotation of impression
Impressions can be automatically rotated by 90 clockwise, 90 anti-clockwise or 180 clockwise. This feature is aimed primarily at those pages within a PDF file that have themselves been rotated. For example, pages might have been scanned in upside down on a scanner in which case any impression stamped on those pages must be rotated by 180 degrees if it is to appear the right-way up. See Positioning
an Impression.
q Transparent impressions
When using Acrobat Version 5 and above impressions can now be transparent so allowing the text below to still be seen. See Positioning an Impression.
q Outline and invisible text
Impressions can now appear in either outline or invisible text, as well as in the normal text previously supported. Outline text is text that is not solid. Invisible text is text that will not appear in the PDF file when it is viewed or printed, but can be searched for within Acrobat: it is particularly useful if you wish to stamp a document with confidential information. This text, including that marked as invisible, can all be used by Acrobat’s Catalog facility for inclusion within PDF indexes.
Normal Text | Outline Text | Invisible Text |
| Normal | |
See Controlling an Impressions Appearance.
q Positioning of impression from top/bottom/left/right of page
Once you’ve entered the co-ordinates at which an impression should display you can now specify if Impress Pro should calculate these co-ordinates from the top, bottom, left or right of your page. This is particularly useful for files that contain pages of differing sizes or
orientation. See Controlling an Impressions Appearance.
q Positioning of impression diagonally from top/bottom left of a page
While full support is still included for pin-pointing exactly where an impression should appear on a page, you can now simply select to stamp an impression diagonally from the top left or bottom left of a page. Impress Pro will then automatically work out the necessary co-ordinates and angle for you.
|
|
The impression will always be positioned across the centre of the page: its angle will differ depending on page size. This feature is particularly useful for files that contain pages of differing sizes or orientation. See Positioning an Impression.
q Using a Clipping Area to position an impression
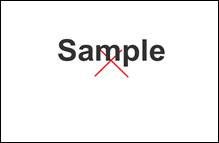
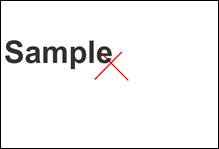
A Clipping area is the area that you see on screen, rather than the full media size of the document. For example you can use the crop tool in Acrobat to crop a document for viewing on screen. Simply by selecting Impress Pro’s new Use Clipping Area option the selected page(s) will be stamped in relation to their clipping area rather than their full media size, as the diagram below demonstrates.
|
See Positioning an Impression. An example of text positioned in relation to its clipping area is Acrobat Help.
q Ability to save information set behind the Info, Open and Security tabs as default settings
New buttons have been added to Impress Pro’s Info, Open and Security tabs allowing you to save the information you set there as Impress Pro’s default settings. For example, you can enter your name into the Author field in the Info dialog box and then save it as the default setting for that field. See Document Attributes. Current buttons are also available to allow you to set (and save) the information to be the same as for the currently open document
About This Manual
This manual gives full details on using Impress Pro. It assumes you have a working knowledge of your computer and its operating system, and of Acrobat (or the particular Viewer you are using for the display of your .PDF files).
The manual is split into the following sections:
Chapter 1 Introduction to Impress Pro
This section. It contains an overview of Impress Pro and lists those features that are new in Version 2. It also gives details on the system requirements needed to run Impress Pro.
Chapter 2 Getting Started
Contains instructions to quickly get you started using Impress Pro by stamping single or multiple files with one or more of the sample impressions supplied with Impress Pro. It also contains details on how you can stamp only selected pages of PDF files and how you can use the new Quick Apply and Quick Undo features.
Chapter 3 Working with Impressions
Contains detailed information on all the options available within Impress Pro for creating your own impressions.
Chapter 4 Setting Document Attributes
Contains detailed information on setting document attributes such as security options and document information.
Chapter 5 Frequently Asked Questions
Answers to some Frequently Asked Questions about Impress Pro.
Appendix A Setting Special Fields Manually
Details how the special fields supported by Impress Pro can be selected manually. This functionality is only included for compatibility with previous versions of Impress Pro as these fields can now be set via Impress Pro’s user interface.
Notational Conventions
The following notational conventions are used throughout this manual:
q Cross-references to other sections or manuals appear in Bold Italics.
q Any variable items from where you have to choose a particular option appear in italics. Italics are also used for emphasis.
q Names of buttons and fields appear in bold: for example, select OK.
q References to menu items are shown as follows: Plug-Ins > Impress Pro…
Here you would select the Plug-Ins option from Acrobat, followed by the Impress
Pro option.
System Requirements
Generally the requirements for Impress Pro are the same as for the version of Acrobat that you are using. Refer to the Acrobat documentation for the minimum requirements for your version of Acrobat.
2: Getting Started
Getting Started with Impress Pro
This chapter aims to help you get started using Impress Pro to stamp impressions on PDF files as quickly as possible to show you just how easy Impress Pro is to use. Follow the instructions given here to see how easily you can use Impress Pro to:
q Stamp a single impression on the current file using the Quick Apply feature
q Stamp multiple impressions on the current file
q Stamp only selected pages with an impression
q Create your own impression based on one of the sample impressions
q Save an impression for later re-use
q Use the Quick Undo feature to remove an impression from the current file
Note: Only impressions stamped using the Quick Apply feature can be removed in this way, and then only before the relevant file has been saved
q Use a font other than one of Acrobats standard fonts for an impression
q Set variables, including Bates numbering
q Stamp multiple files with multiple impressions
| Once an impression has been stamped on a file and that file has been saved, you cannot remove that impression. It is permanently embedded within your file. You are thus strongly advised to take backups of your files before running Impress Pro over them. |
You can however, use Acrobat’s File > Revert option to remove an impression before a file has been saved, or alternatively is stamping the current file you can us Impress Pros new Undo facility.
This chapter is not designed to be an exhaustive list of all Impress Pro’s features, and indeed, does not contain details on all the features offered by this publishing tool. Instead, it concentrates on getting you started using Impress Pro as quickly as possible by showing you how just how quick and easy it can be to stamp impressions on PDF files.
Comprehensive details on stamping impressions can be found in Chapter 3 Working with Impressions: while details on setting document information can be found in Chapter 4 Setting Document Attributes.
Starting Impress Pro
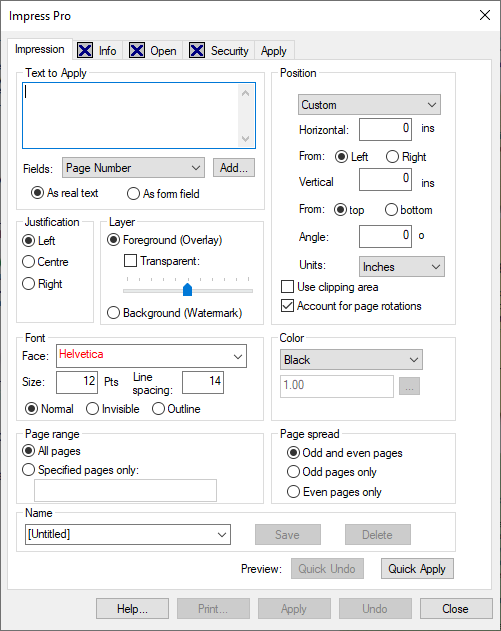
To start Impress Pro you simply select the Impress Pro option from Acrobat’s Plug-Ins menu. The Impress Pro dialog then displays.
| If you intend to work with Impress Pro in batch mode with multiple documents, you do not need to open a PDF document in Acrobat before starting Impress Pro. |
Five different tabs are available for selection. Each contains options allowing you to perform various tasks. Simply click the tab you require to display the appropriate options:
q Impression
The active tab when Impress Pro first starts. Options here allow you to create new impressions, or select an existing one, for stamping your PDF document(s). If stamping a single impression on the current file the Quick Apply feature is available here, otherwise you must use options behind the Apply tab to actually stamp your document(s).
q Info
Allows you to set standard document information for your document(s).
q Open
Allows you to control the appearance of your PDF documents and the window in
which they display when first displayed in your viewer.
q Security
Allows you to set standard file security options for your document(s).
q Apply
Allows you to select multiple impressions and/or multiple documents to be
stamped during this session of Impress Pro. Using options here you can also
apply any document information set using the Info, Open and/or Security tabs.
You will notice an X next to the Info, Open and Security tabs.
When you make any changes to any of the options behind any tab its associated X will change to a tick (check mark) to indicate that changes have been made.
Working with a Single File
The following sections all look at using Impress Pro to stamp impressions on your current PDF file. Before starting to work through the steps given here (and throughout the rest of this chapter) you must first create nine sample test files. These files are referred to throughout this section as testfile1.pdf, testfile2.pdf, testfile3.pdf testfile9.pdf. These files should each be at least ten pages long, but for the purposes of the following exercises their contents are not important. You should however take backups of each file before commencing the following exercises, in case you need to revert back to the original file for any reason.
Stamping a Single Stamp
Follow the steps below to stamp a single impression onto the current document using the Quick Apply feature:
To stamp a single impression on the current file:
1. Open the PDF document you want to mark with the impression. For the purposes of this example you should open your own testfile1.pdf.
2. Select Plug-Ins > Mapsoft >Impress Pro from Acrobats main menu. The Impress Pro dialog box will then display.

| You will notice that the Font Face (Helvetica) appears in Red in the Face field. This is because this particular font is one of the Acrobat Base Fonts. All Acrobat’s base fonts appear in Red in the drop down list associated with this field, to distinguish them from the available System fonts. Acrobat Base Fonts do not need to be embedded into the PDF file because they are always provided with Acrobat. Thus using Acrobat Base Fonts will generally make your PDF files smaller |
3. Select the name of the impression you want to use, in this case the Confidential sample impression, from the drop-down list of available impressions in the Name field, as shown below.
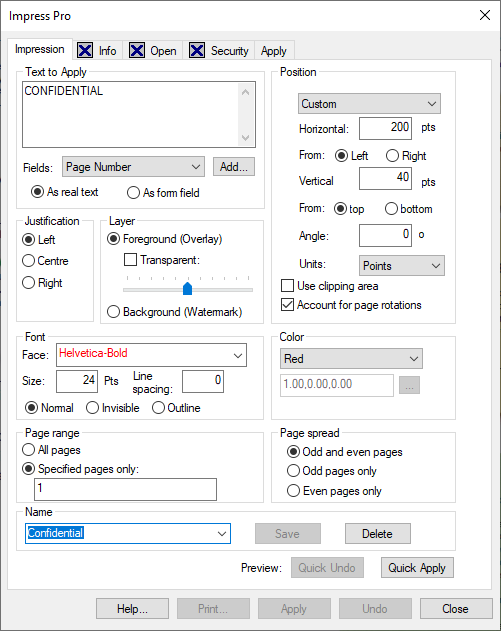
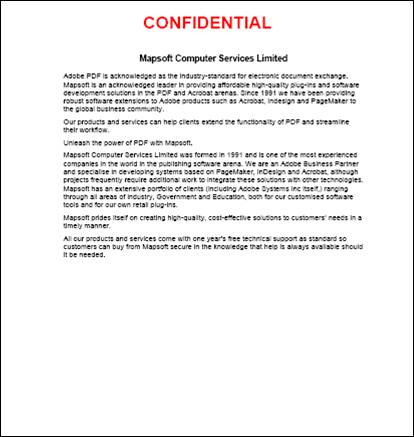
4. Click the Quick Apply button to stamp your test file with the Confidential impression.
The word Confidential in Red Normal text will now appear at the top of the first page of your test file as illustrated below.
Move the Impress Pro dialog box if necessary so you can check that this is the case.
5. Click Close to exit from Impress Pro.
You have now stamped your first file with an impression using Impress Pro. Saving this test file will permanently embed this impression into that file if you so wish.
Undoing a Stamp
If you use the Quick Apply button to stamp a file with an impression, you have the option of immediately using the Undo button to remove that impression quickly and easily from your file if you decide its effect is not as you had wished.
Follow the steps below to apply Impress Pros Draft sample impression to testfile2.pdf and then remove it immediately.
To undo an impression:
1. Open your test file, testfile2.pdf.
2. Select Plug-Ins > Mapsoft > Impress Pro… from Acrobat. The Impress Pro dialog box shown in the previous section now displays.
3. Select the Draft sample impression from the drop down list in the Name Configuration field.
4. Click the Quick Apply button to stamp the text Draft in red as a watermark on each page of your file.
5. Now, click the Undo button to remove the impression Draft from every page.
Used together the Quick Apply and Undo features give you the ability to preview a stamped file to quickly check whether or not you think an impression is suitable for your needs.
| Using Quick Undo to remove an impression can only be done in the current session of Impress Pro. Once you quit the Impress Pro dialog box you will not be able to use the Quick Undo feature to remove impressions already stamped into your file(s). (However, impressions could still be removed using Acrobats File > Revert option until the file has been saved). It is recommended that you have the file open in Fit to Window mode, so that you can view the impression before deciding whether you want to keep it or not |
Changing an Impression
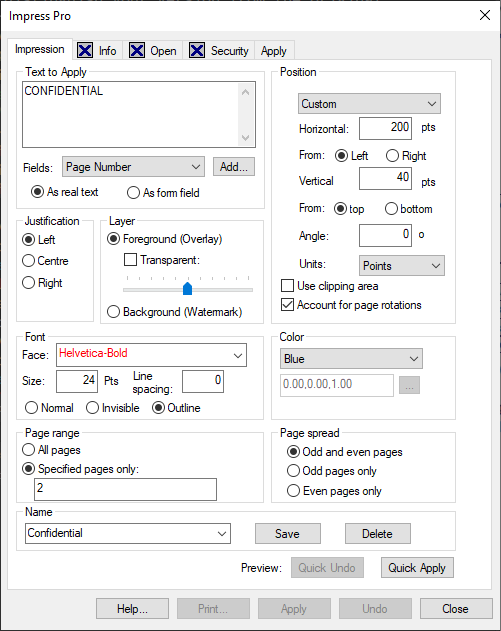
If you wish you can make modifications to any of Impress Pros sample impressions (or indeed to any of your own impressions once you’ve created some). For example, you could change the Confidential impression so that it stamps the text Confidential onto the second page of your file and not the first one. In addition, you could also change it so that the text is stamped as Outline text, rather than as Normal text, and that it appears in Blue not Red. The following steps show how you can do this.
To modify an existing impression:
1. Re-open your file testfile1.pdf (if you closed it earlier).
2. Re-open Impress Pro if necessary.
3. Next, select the name of the Confidential impression from the drop-down list of available impressions in the Name field.
4. Type 2 in the text area below the Specified Pages Only radio button in the Page Range field.
5. Select Blue from the drop down list of options in the Color field.
6. Select the Outline radio button in the Font field.
The Impress Pro dialog should now look as follows:
7. Click the Quick Apply button to stamp the text Confidential in Blue Outline font onto the second page of your test file as illustrated below
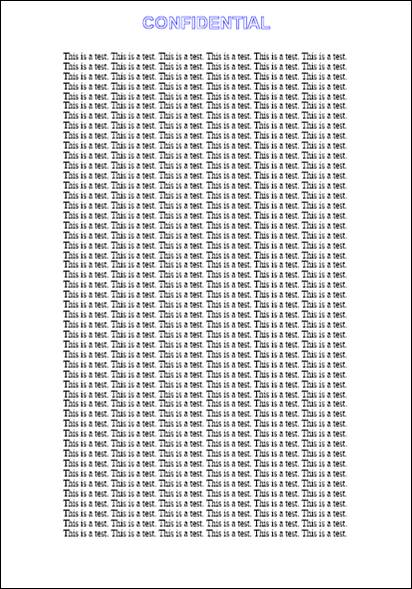
You will also notice that the original impression still remains on the first page.
8. Now proceed to Step 2 in the following section Saving an Impression to save your impression for later re-use.
Saving an Impression
Having modified an existing impression, or created a completely new impression of your own, you can then save that stamp for repeated re- use. Now, having successfully altered the sample configuration Confidential we will now save your modified version of that stamp for later re-use. The following steps show you how you can do this.
| It is always advisable to save a modified impression with a different name: otherwise you would overwrite the original version. |
To save a new or updated impression:
1. If you quit Impress Pro at the end of the previous set of instructions, repeat steps 1 through 6 given in the previous section, Changing an Impression. You will notice that all the options you changed have reverted to their previous settings as you did not save them. However, if you did not quit Impress Pro at the end of the last series of instructions, proceed directly to step 2 below.
2. Now, type the name to be used for the modified version of the impression in the Name field. You could use Confidential-Blue to distinguish your version from the original (Confidential).
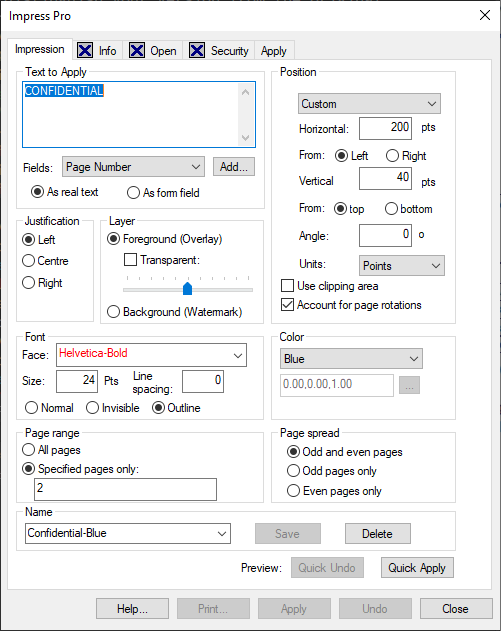
3. Click Save to save your impression with the new name.
4. Click Close to exit Impress Pro.
Next time you start Impress Pro the name of your new impression will display in the drop down list in the Name field, as shown here, to indicate it is available for selection:
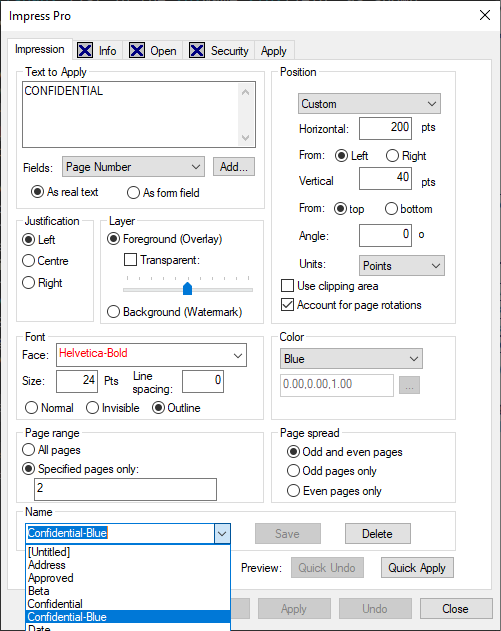
You could of course combine the above steps with those given in the previous section Changing an Impression, so modifying, saving and applying an impression all in one.
Specifying the Page Range/Spread
It is possible to specify which pages of a file should be stamped with your chosen impression by using the Page Range and Page Spread fields. You can specify that All pages should be stamped, Odd pages only or Even pages only.
Alternatively, you can even specify the actual page numbers of those pages which should be stamped. When specifying the actual page numbers, you can enter a range of pages (separated by hyphens), contiguous pages (separated by commas), or a mixture of the two.
The steps below show you how you can stamp the current date onto page 1, pages 4 through 8 and page 10 of your test file testfile3.pdf.
To specify the page range/spread:
- Open your file testfile3.pdf.
2. Open Impress Pro by re-selecting Plug-Ins > Impress Pro…
3. Next, select the name of the Date impression from the drop-down list of available impressions in the Name field.
4. Select the Specified Pages Only radio button in the Page Range field.
5. Next type: 1, 4-8, 10 in the text area below, as shown in the following screen snap.
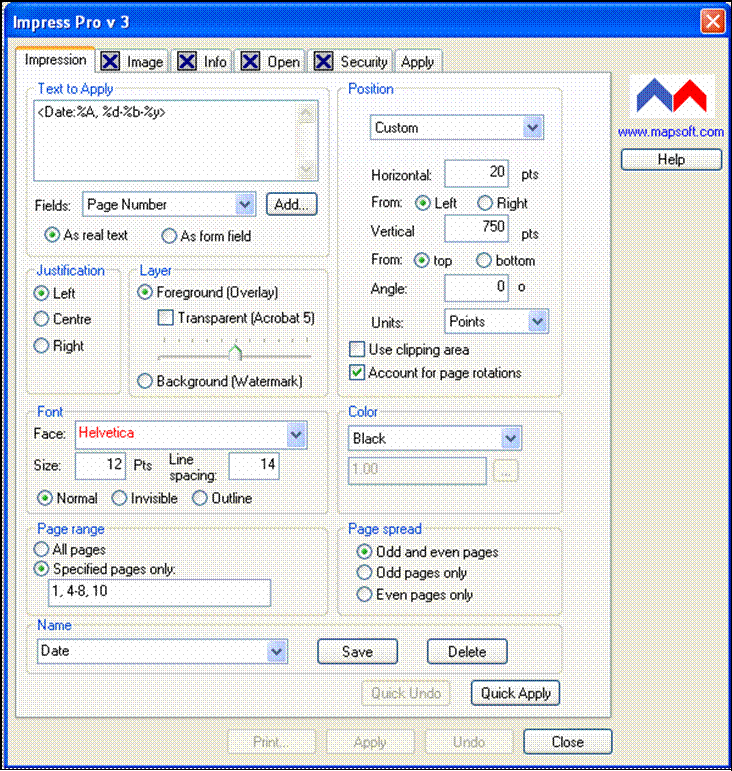
| You do not have to include spaces between each entry. |
6. Click Quick Apply to stamp the specified pages of your document with the current date.
The date, in the format Full Day, Date-Abbreviated Month-Abbreviated Year, for example Friday, 23-Sept-05 should now appear in
black on the bottom left area of pages, 1, 4, 5, 6, 7, 8 and 10 (provided your file has this many pages in it).
7. Click Close to close Impress Pro.
Specifying Variable Data
In addition to containing specific text, impressions can also include variable data, such as date, time, page count or page number information that will be replaced with actual text values when the file is stamped.
The Date sample impression used in the previous section, Specifying the Page Range/Spread is an example of an impression that contains variable data. Many options are available to you to allow you to customise the appearance of date/time data. For example, you might want the date Friday 23 Sept 05 in the previous section to appear in one of the following formats instead:
- Friday 23 September 05
- Fri September 23 2005
- 09/23/05
- 23/09/05
- to show just a few of the possible date combinations.
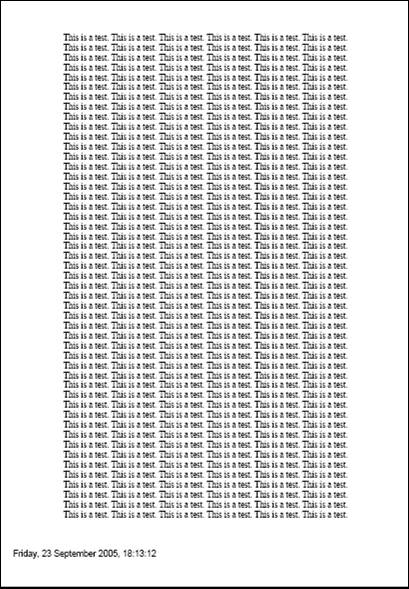
Follow the instructions given below to stamp a PDF file with the current Date and Time in the form:
Full Day Name, Day of the Month, Full Month Name, Full Year Name, Hours (using 24-hr clock):Minutes:Seconds
For example:
Friday,
23 September 2005,
13:24:56
| Any punctuation that is to be part of the date must be manually inserted when defining the variable data. |
To specify date and time
1. Open your file testfile4.pdf.
2. Open Impress Pro by re-selecting Plug-Ins > Impress Pro…
3. Select the Date and Time option from the drop down list of options in the Fields field.
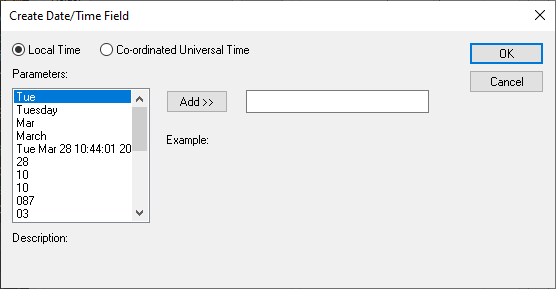
4. Click the Add button next to the Fields field to display the Add Date and Time dialog box.
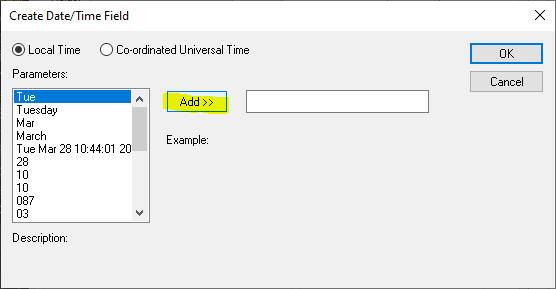
Here you can select the format in which you wish the Date and Time information to appear.
| Tool tips are available for each parameter under Description. |
5. Select the full name of the current day from the list of parameters, for example Tuesday.
6. Click Add. The entry:
%A
should now appear in the un-named text field next to the Add button.
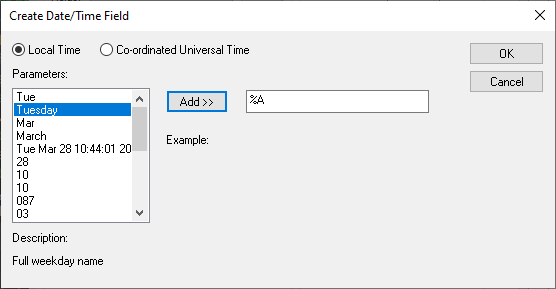
7. Manually type a comma (,) followed by a space into this text field immediately after this entry to separate it from the next entry you will make. (Otherwise there will be no punctuation or spacing following the Day entry in your impression.)
8. Next select the current day of the month, for example 09, and then click the Add button. The entry:
%d
should now appear in the text field after the %A entry.
9. Manually type a space into this text field after this entry.
10. Next select the current month, for example January, and click the Add button. The entry:
%B
should now appear in the text field after the existing entries.
11. Manually type a space into this text field after this entry.
12. Next select the current year in unabbreviated format, for example 2005,
and then click the Add button. (You may need to scroll down the list of available entries.) The entry:
%Y
should now appear in the text field after the existing entries.
13. Manually type a comma followed by a space into this text field.
14. You are now ready to select the Time information. First select the Hour, in 24-hour clock format, for example 13, and then click the Add button. The entry:
%H
should now appear in the text field next to the Add button.
15. Manually type a colon (:) into the un-named text field to the right of the Add button. Do not insert a space here as you want the time
information to be separated by colons, not spaces.
16. Next select the current Minutes, for example 24, and then click the Add button. The entry:
%M
should now appear in the text field next to the Add button.
17. Manually type a colon into this text field.
18. Finally, select the current Seconds, for example 56, and then click the Add button. The entry:
%S
should now appear in the text field next to the Add button.
The dialog box should now look like the following:
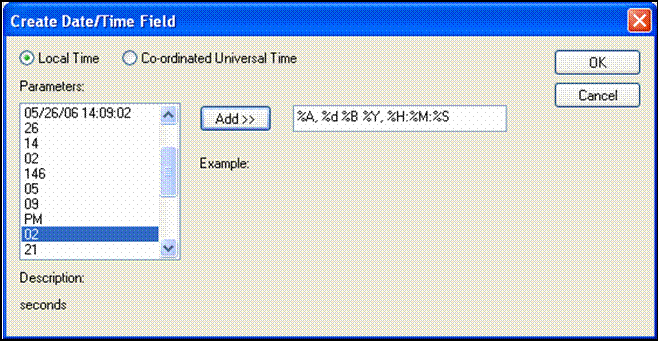
19. Click OK to return to the main Impress Pro dialog box, where the special Date/Time fields you just selected will now be
displayed in the Text to Apply field.
| You will notice that Impress Pro has automatically inserted < and > delimiters. These are required to enable Impress Pro to identify variable data. |
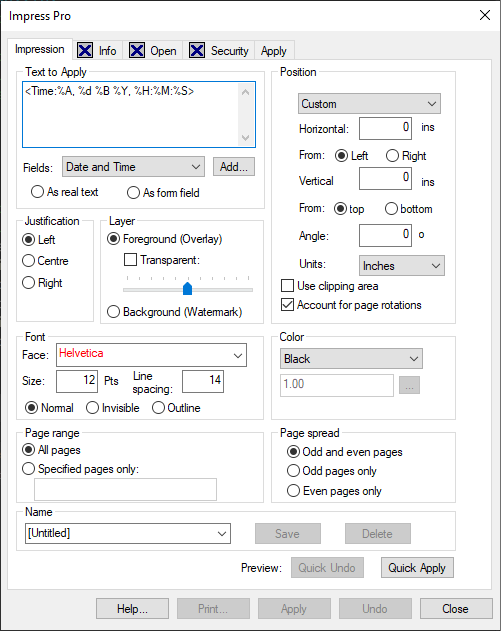
20. Next, you must specify the position at which you wish your new impression to be stamped. In the Position field click the Custom radio
button and set the co-ordinates you require, for example:
Units Points
Horizontal 20
Vertical 750
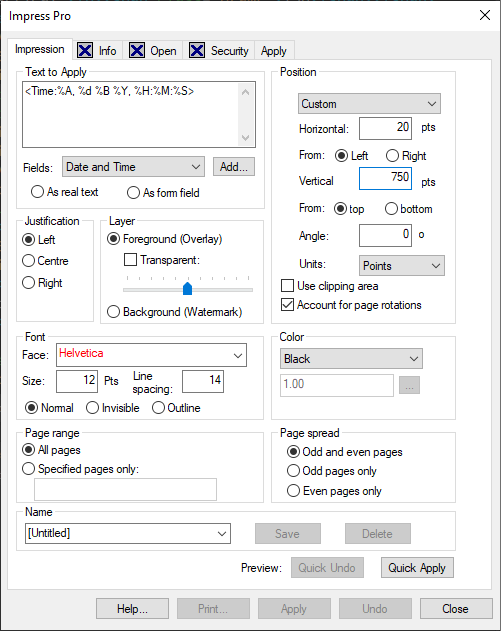
21. Now click Quick Apply to stamp your file with the current date and time in the chosen format as illustrated below.
22. Click Close to quit Impress Pro (saving the impression with a new name first if you so wish).
Stamping a File with Multiple Impressions
While the examples in the previous sections all stamp a single impression onto one file, you can also stamp multiple impressions onto a single file (or indeed onto multiple files). Follow the steps below to stamp one of your test files with three sample impressions, Confidential, Date and Draft, in one stamping operation.
To stamp the current document with multiple impressions:
1. Open your test file testfile5.pdf.
2. Select Plug-Ins > Impress Pro… in Acrobat, to display the Impress Pro dialog box.
3. Click the Apply tab to display further options.
4. Click the Selected impressions radio button. This activates the To be applied and Not to be applied fields. All the currently available impressions are listed in the Not to be applied field, as in the example below.
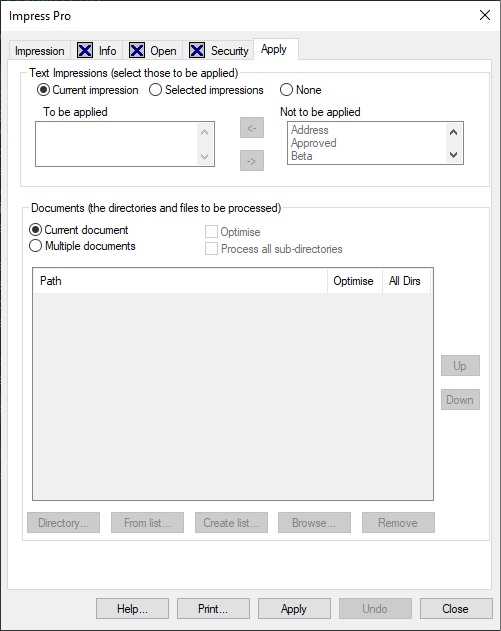
5.
Next, select the impressions you wish to stamp onto your file from the Not to be applied field. Select the first impression you require, for example Confidential, and then click the left facing arrow to move the selected impression from the Not to be applied field into the To be applied field.

6. Repeat step 5 for the Date and Draft impressions: the Impress Pro dialog box should now look as follows:
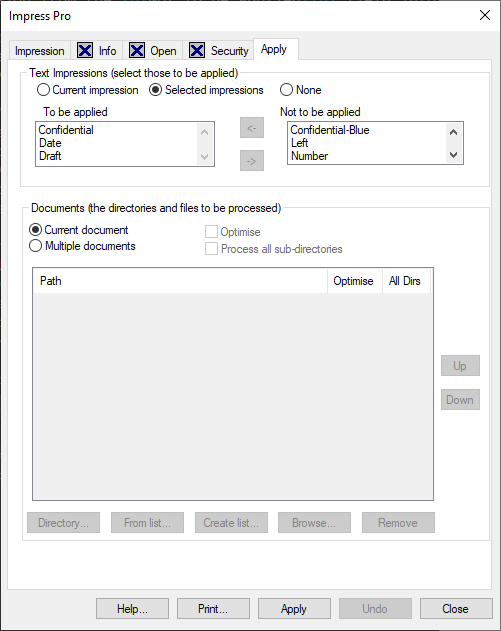
| If you inadvertently select the wrong impression, simply select the unwanted impression in the To be applied field and click the right-facing arrow to move the selected impression back to the Not to be applied field. |
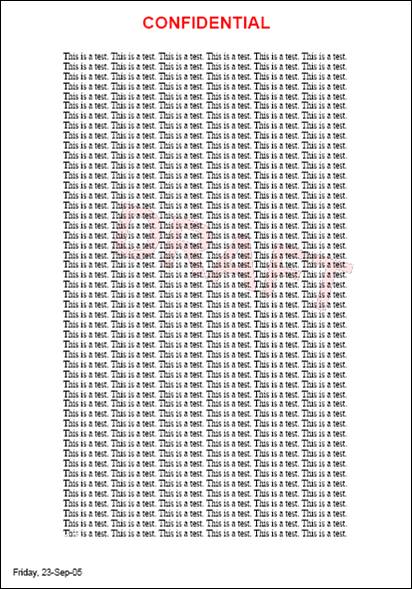
7. Now, click the Apply button to stamp your document with the three selected impressions as
illustrated below.
| The Quick Apply and Quick Undo features are not available when working with multiple impressions. |
8.
Click Close to quit Impress Pro.
Working with Multiple Files
You can also work with Impress Pro in batch mode, stamping multiple files with your chosen impression(s) in one stamping operation. Follow the steps below to stamp four of your test files, testfile6.pdf, testfile7.pdf, testfile8.pdf and testfile9.pdf with the Approved sample impression.
To stamp a single impression on multiple files:
1. Select Plug-Ins > Impress Pro… within Acrobat to display the Impress Pro dialog box.
2. Close any PDF documents that are currently open. It is always advisable to do this when stamping multiple files.
3. Select the Approved impression from the list of available impressions in the Name field.
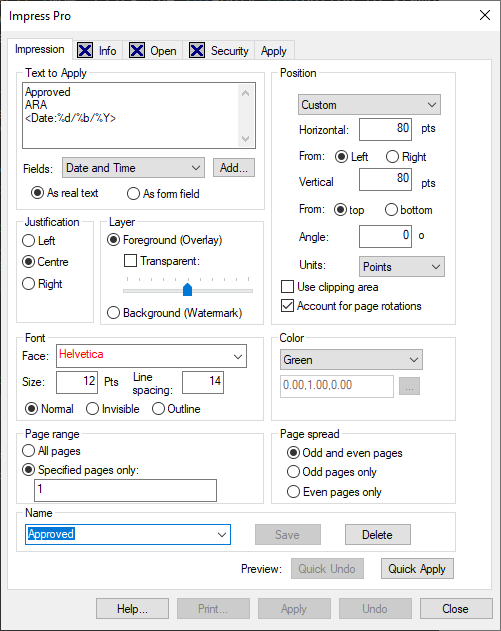
4. Click the Apply tab.
5. Click the Current Impression radio button to indicate you wish to stamp the selected files with the impression you just chose.
The Impress Pro dialog box should now look as follows:
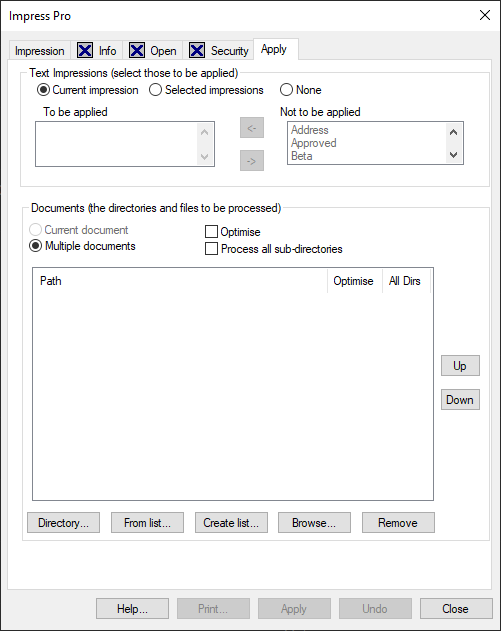
| The Current Document option is greyed out because no documents are currently open and the Multiple Documents option has been set automatically. If you did have a document open you would now need to set the Multiple Documents radio button. |
6. Check the Optimise button.
7. Next you need to enter the names of the files you wish to stamp with your chosen impression, in this instance testfile6.pdf, testfile7.pdf, testfile8.pdf and testfile9.pdf. You can do this in a number of ways, use:
- Drag & Drop to pull the relevant files into this text box.
- the Browse button to display a further dialog box from where you can search for the files you require.
- the Directory button to display a further dialog from where you can select a directory. Impress Pro will add all the PDF files found within that particular directory to the list.
- the From List option to select PDF files or standard directories from an existing text file listing the appropriate files. The program will look through the contents of a list for file/directory names and locations, check they exist before adding them here. Files/directories can be found either line by line (see example below), or if you are searching a comma delimited file, then between the commas.
| If any files you do not require are listed, use Remove to remove them. |
8. Whichever method you used to select your files, the Impress Pro dialog should now look something like the following:
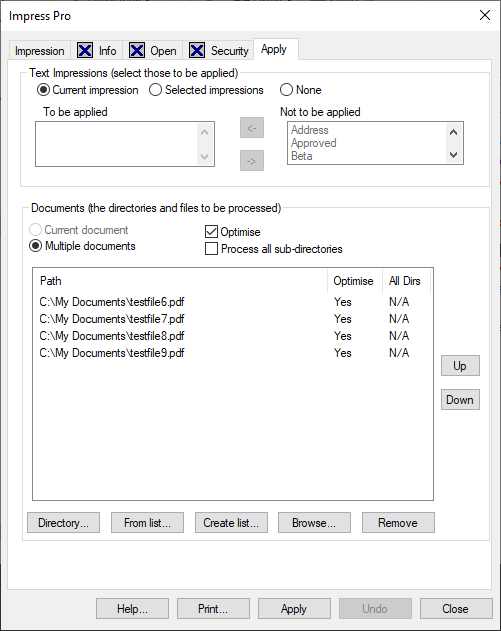
| Files will be stamped in the order in which they appear in this list. You could re- order the files within the list using the Up and Down buttons, to ensure files were stamped in a specific order. This is particularly useful for example if stamping serial numbers or other information across multiple files where the ordering of the files is significant. See the section Including Variable Data in the next chapter for full details on stamping one unbroken sequence of numbers across multiple files. |
9. Click Apply to stamp the selected file with the chosen impression.
| The Quick Apply and Quick Undo features are not available when working with multiple files. |
10. Click Close to quit Impress Pro.
You could of course stamp multiple files with more than one impression and/or variable data.
3: Working with
Impressions
Creating Your Own Impressions
Impress Pro allows you to create your own impressions for stamping PDF documents. You can save your impressions for subsequent re-use. You can choose to stamp one or more documents with one or more impressions.
This chapter gives full details on all the options available to you for:
q Creating, customising or updating impressions
q Stamping PDF files with your impressions
Once a file has been marked with an impression, that stamp will be permanently embedded within that file when that file is saved. You will NOT be able to subsequently remove any impressions from a file once it has been saved.
| You are thus strongly advised to take backups of your files before running Impress Pro over them |
You can however use Acrobat‘s standard File > Revert option to remove an impression before the relevant file has been saved. (You can also use Impress Pro’s Quick Undo facility if the file was stamped using the Quick Apply facility.)
Options to create and edit impressions are found behind the Impression tab in the Impress Pro dialog box. This tab is the one that is active when you first start Impress Pro, by selecting the Impress Pro option from Acrobat’s Plug-ins menu.
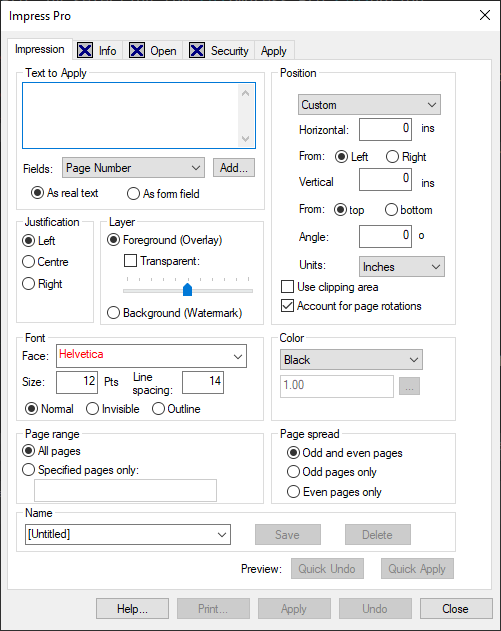
Options available here allow you to:
- Create the text for a new impression or modify the text of an existing one. See Specifying Text for an Impression for details.
- Specify any variable data relating to page numbering and date/time stamps that should appear in your impression. See Including Variable Data for details.
- Specify the appearance of your impression, including its color and font. See Controlling an Impression’s Appearance for
details. - Specify the positioning of your impression on the page and whether it should appear as a watermark or not. See Positioning an Impression for details.
- Give details on those pages of your PDF file on which the impression should be stamped. See Specifying Page Ranges for details.
q Name
your impression and save it for future re-use. SeeNaming an impression for details.
Specifying Text for an Impression
You specify the actual text you want to be stamped as your impression in Impress Pro’s Text field, as in the example below:
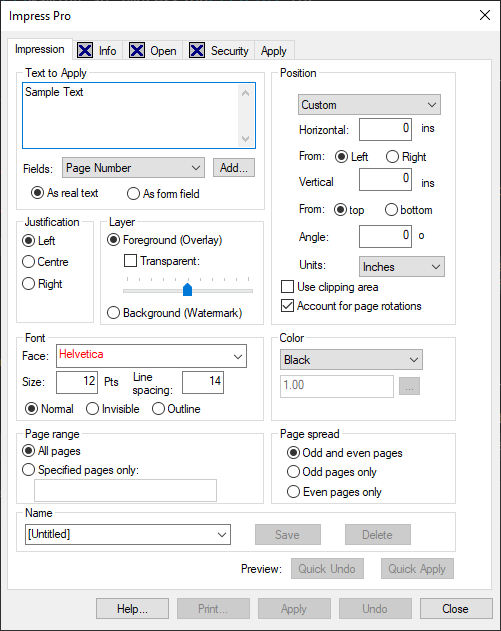
Text specified here will be stamped on all the specified pages within your PDF file(s) when you Apply your impression(s).
You can enter any text you want as your impression. A single impression can spread over multiple lines. If you wish to create a multi- ine text impression just use the Enter key (Return key) to create each new line. The line spacing is defined by setting the leading value. The leading value should be the height of the font plus the amount of space that you wish to see between the lines. However, if you wish to apply several lines of text with different attributes, then you should do this by creating several impressions, saving them and then applying them as multiple impressions (using options behind the Apply tab).
| You can insert foreign characters to use in your impression by pasting from a character map. |
Within the text of an impression you can also include some special fields relating to variable data such as page numbering and date/time stamps. See Including Variable Data below for full details. These special fields can be selected using the Fields field and are then inserted automatically into the Text box where they are delimited by the < and > characters to distinguish them from ordinary text.
| If you want to use the < and > characters in the actual text of an impression you must first escape them with a \ to prevent them from being recognised as a special field. To include a \ character within your text, enter it as \\ |
Including Variable Data
Impressions can include variable data such as:
q Date and Time Stamps
q Page Numbers
q Page Count
q Filename Information
q General File Information
q Serial Numbers
To include any of the available variables within the text string of your impression first choose the type of field you require from the drop down list of available fields shown in the Fields field, (illustrated below) and then click the Add button.
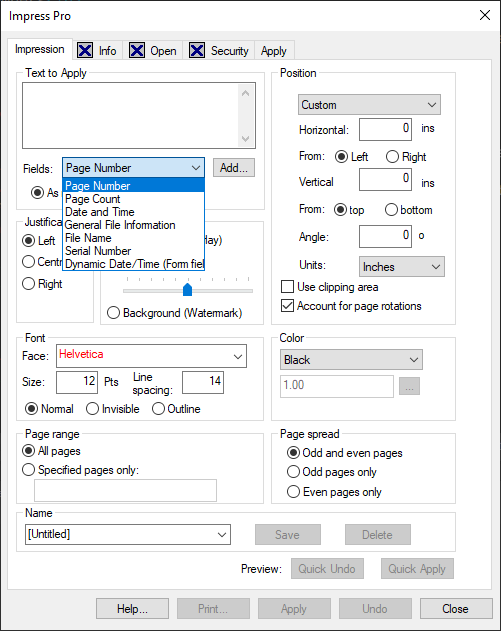
When you have done this, a dialog box containing options that are specific to that particular type of field then displays. These dialog boxes are described in the following sections. From each dialog box you can select further parameters controlling the appearance of that type of data.
Once you have made your selection Impress Pro automatically inserts the special field code associated with that field into the Text field. For example, if you select the Bates Numbering variable, the special field code <BatesPageNumber> will be inserted into the Text field. These special codes are automatically enclosed within <> characters to distinguish them from ordinary text. Some of these special fields, such as the Date/Time ones, can also have parameters associated with them. Parameters are preceded by a % character.
For your information, a full list of these codes is given in Appendix A Setting Special Fields Manually.
| In versions of Impress Pro pre-dating Version 2.0, all special field codes had to be entered manually directly into the Text box. For compatibility with earlier versions of Impress Pro you can still set these manually, although this is no longer the recommended method. See Appendix A Setting Special Fields Manuallyfor details. |
When you stamp any files with the selected variable data, the special field codes are replaced with the actual variable data itself, for example the current date and time, and it is this data that is actually stamped, not the field codes themselves.
The following sections describe the options found in all the Variable Data dialog boxes.
Date and Time Stamps
There are a number of different date and time stamps which you can use for stamping date and time information into your PDF documents. When stamping a PDF document with any of the supported date or time stamps Impress Pro reads the date or time only once, and uses the same value for all subsequent impressions while the Impress Pro dialog box remains open. This prevents any inconsistencies arising if you stamp the time more than once during the same session.
When you select the Date and Time option from the drop down list in the Fields field and then click the Add button the Create Date/Time Field dialog box displays. Here, you can select the format in which you want the date/time to be stamped on your documents.
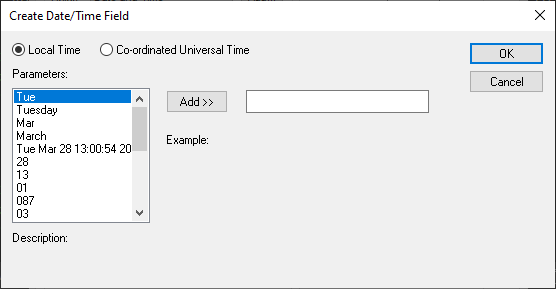
Choose if you want the date/time to be stamped in the Local Time or the Co-ordinated Universal Time by default. Depending on your selection either the <Time> or <TimeUTC> special field codes will be inserted into your impression’s text string when you click OK to quit the Create Date/Time Field dialog. The actual default date/time format in which the date/time will be stamped will depend upon your locale, and will change in line with any changes that might be made to the International settings within your Windows Control Panel.
You can choose any combination of parameters from the pull down list available in the Paramaters field, to further control the format in which the date/time are to be stamped on your document(s). Click Add to select each option you require in turn.
| If you highlight an option from the list a brief description of that option appears in the Description field. |
Please refer to the table in Appendix A Setting Special Fields Manually for a description of each of the options available in the Parameters field. It also shows the special field codes associated with each of these options that will be automatically generated by Impress Pro and inserted into the relevant Time field code in your impressions text string when you click OK.
For example, to stamp the following date/time information in Local Time format:
q Day of Week (in full)
q Day of Month
q Month (in full)
q Year
(with century)
q Hour
(12 hour clock)
q Minute
q Seconds
q AM/PM indicator
select the appropriate entries from the Parameter field and click Add. The relevant special field codes will then be automatically displayed in the field next to the Add button, as illustrated below:
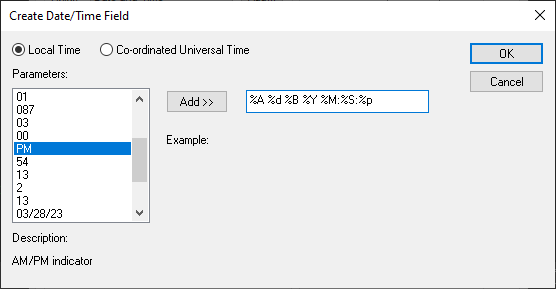
| Punctuation has been added here to make the date/time string more readable. |
The options you select here, together with any punctuation you add to the string, will all be inserted into the Text field in the Impress Pro dialog box after you have clicked OK in the Create Date/Time dialog box. Impress Pro will automatically enclose the special field code within the special field delimiter characters, < > as shown below.
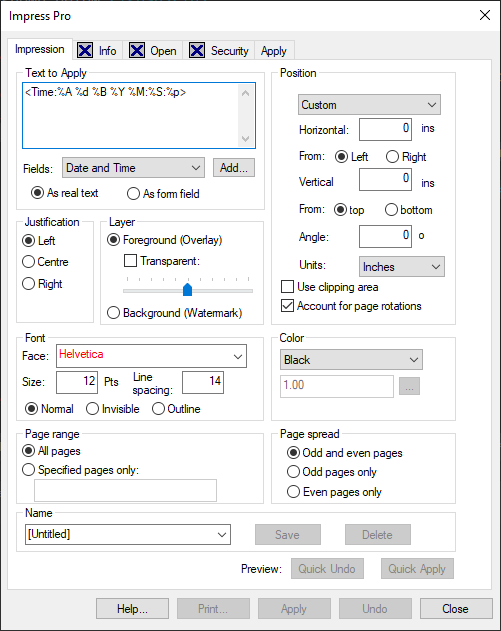
If you were to stamp a PDF document with this particular impression the date/time would appear in the format:
Monday 26 September 2005
10:48:10
AM
| Date and Time are synonymous when an explicit format is specified; the only difference is the default format. |
Page Numbering
The Create Page Numbering Field dialog box displays when you select the Page Number option from the Fields field and then click the Add button.
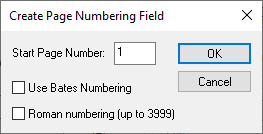
| Page numbers relate to the position of a page within the overall document, not just those included within a particular range. |
Here you can specify the number at which page numbering is to commence into the Start Page Number field. By default page numbering will commence from 1.
| The maximum limit for standard page numbering is 999999999. |
Setting the page number option will generate the special field code <PageNumber> (plus any appropriate parameter) and inset it into your text string.
You can also specify that pages are to be numbered in accordance with either the Roman numerals system or the Bates Numbering system, by enabling either the Roman Numbering or the Use Bates Numbering check box.
Bates numbers are commonly used in legal documents and consist of six characters, up to a maximum of 999999. For example page 1 would be 000001 when using Bates numbering.
You can also specify that pages are to be numbered using the Roman Numbering system, by enabling the Use Roman Numbering check box. Roman Numerals are commonly used in introductory type material or document Prefaces. Impress Pro can only represent numbers from 1-3999 in Roman Numerals, as most fonts do not support the extra line on top of the characters that would be required to represent larger numbers.
If you use this feature with multiple documents, the page numbering for each new document will re-start from the page number specified here (typically 1). For example, if stamping page numbers onto three documents, the first having 250 pages, the second 22 pages and the third 58 pages when Start Page Number is set to 1 (the default) the pages in the 250 page document will be numbered 1 to 250, those in the 22 page document will be numbered 1 to 22 while those in the 58 page document will be numbered 1 to 58. However, it is possible to stamp multiple documents with one unbroken page numbering sequence by using the Serial Number field. In this example, the 250 page document would still be numbered 1 to 250 (as it is the first document to be stamped) but the 22 page document (the second document) would be stamped with the page numbers 251 to 272, while the 58 page document would be stamped 273 to 330 to give an unbroken numbering sequence across the three different documents. See the section Serial Number below for further details.
It is also possible to offset page numbering using this feature, so page 1 is stamped on a page that is not the first page in the file. To do this, enter a negative number into the Start Page Number field. Because the physical page numbering of PDF files starts from 0 this number must be 2 out. Then enter the physical page on which page 1 should be stamped into the Specified Pages Only radio button in the Page Range field. For example, to stamp page number 1 onto physical page 10 enter an offset of -8 into the Start Page Number field and then enter 10 into the Specified Pages Only field in Page Range. This will stamp 1 onto page 10, 2 onto page 11 and so on to the end of the file.
Page Count
You can also include a page count within your impression. This is commonly combined with page numbering information, and the same page numbering formats are supported for page counts as they are for page numbers.
To set the page count, select the Page Count option in the drop down list of fields in the Fields field and then click the Add button. The Create Page Count Field dialog box will then
display.
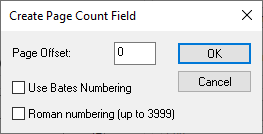
Here you can enter the page offset to be used for the page count, starting from page 1 by default. You can also specify if you want to use either Bates numbering or Roman numerals in the page count, for consistency with the style of the page numbers that have been selected in the Page Numbering field.
You can combine the PageCount and Page Number variables. For example the following mixture of actual text and special fields:
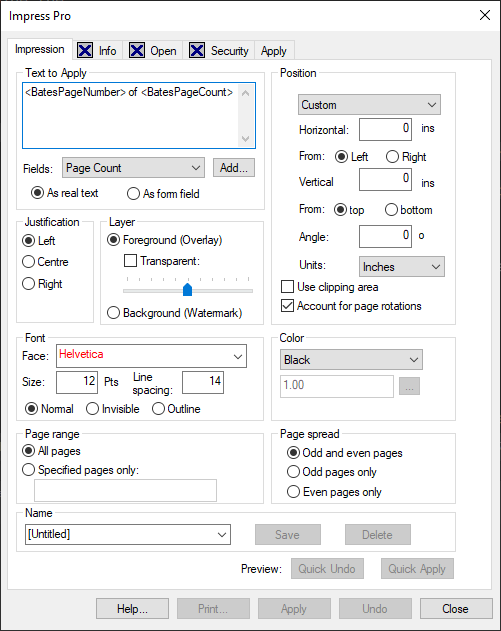
would use the Bates numbering system to stamp your PDF files with page number and page count information in the form:
Page 000001 of 000010
File Name
You can stamp your PDF file with file name information in any of the following formats:
q File name only (without any extension), for example MyDocument
q File name with extension, for example MyDocument.pdf
q File name with extension and including full path name, for example, c:\MyFiles\MyDocument.pdf
To stamp file name information select the File Name option from the Fields field to display the File Name Field dialog. This will look something like the following:

Simply select the radio button corresponding
to the option you require and click OK.
General File Information Fields
You can stamp your PDF file with the following general file information:
q Title
q Subject
q Author
q Keywords
To specify the file information you require select the General File Information option from the Fields field to display the General Information Fields dialog:
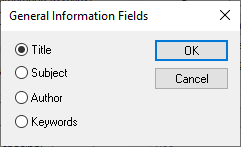
Simply select the radio button corresponding to the option you require and click OK.
Serial Number
You can stamp a serial number onto your PDF file(s) using Impress Pro. In this context, a serial number is a user-defined variable for storing numbers. A serial number could be a traditional serial number, or alternatively it could be something like revision numbers or version numbers. This feature can also be used to stamp an unbroken sequence of page numbers across multiple files, (unlike Impress Pro’s standard Page Number variable which stamps multiple files individually with their own sequence of numbers). See below for details on how to do this. Each time the serial number is used it is automatically incremented by one. Its current value is automatically shown as the next number in the sequence if you subsequently re-use the same sequencing set.
To set serial numbers, select the Serial Number option in the Fields field to display the Create Serial Number Field dialog.
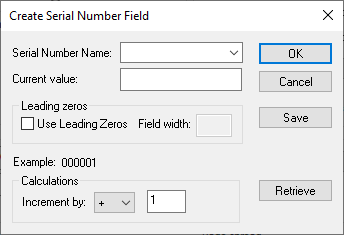
Here you can set a number of options to customise the appearance of serial numbers in your documents:
Serial Number Name | The name of this particular serial numbering sequence. You only need to |
Current Value | The current value from which the serial numbering sequence is to commence. You must make an entry in this field. |
Leading Zeros | If you check the Use Leading Zeros check box, your |
Increment By | Each time Impress Pro stamps a file with a serial number, this setting increments or decrements (depending on whether you select the + or symbol) the serial number by the number shown here (1 by default). |
You can Save this numbering sequence to retrieve for future re-use if you wish.
It is also possible add serial numbering information sequentially across a number of files.
To stamp one numbering sequence across multiple documents:
1. Select the Serial Number option from the Fields field in Impress Pro.
2. Enter a Serial Number Name for this numbering sequence, for example, Naming Sequence 1, and then enter 1 in the Current Value field to start this particular sequence from 1.
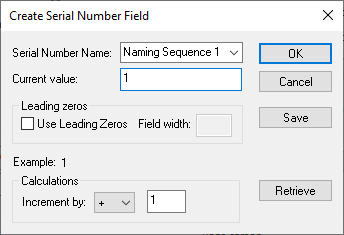
3. Next, check the Use Leading Zeros checkbox to insert leading zeros into the serial numbers and enter 10 in the Field Width box to allow serial numbers of up to 10 digits to be calculated for this particular serial numbering sequence.
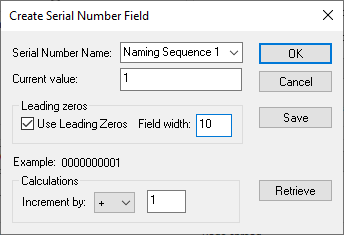
4. Click Save to save this sequence.
5. Click OK to return to the main Impress Pro dialog box where the Serial Number code you just created will now appear in the Text to Apply field.
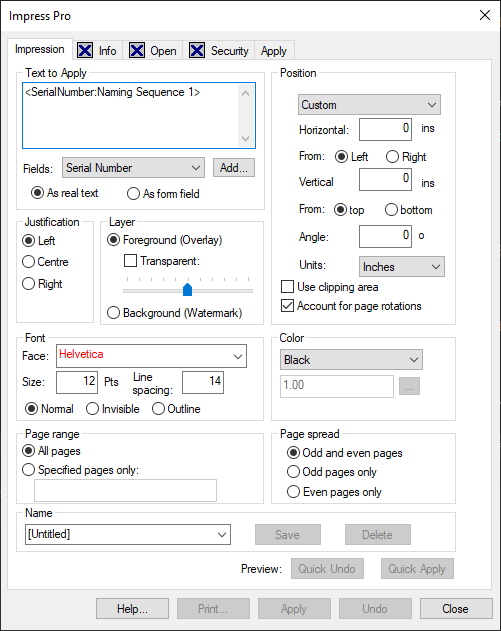
6. Type Page followed by space immediately before this special code. This will insert the word Page before each number as it is stamped onto each page in the appropriate documents.
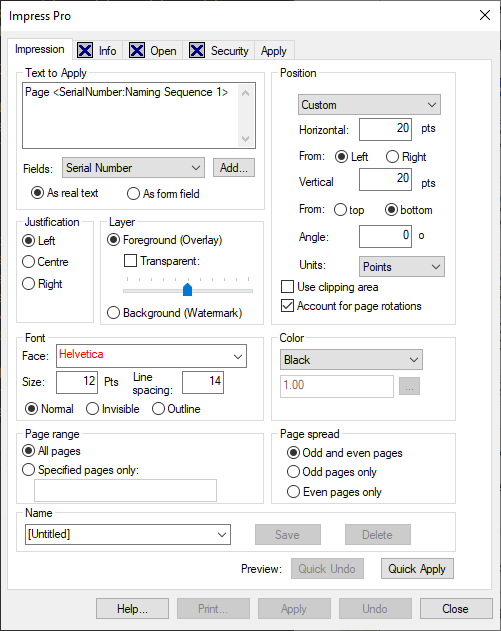
7. Enter a name for this numbering sequence in the Name field and then click Save.
8. Next. click the Apply tab and then select the Current Impression radio button.
The Impress Pro dialog box should now look as follows:
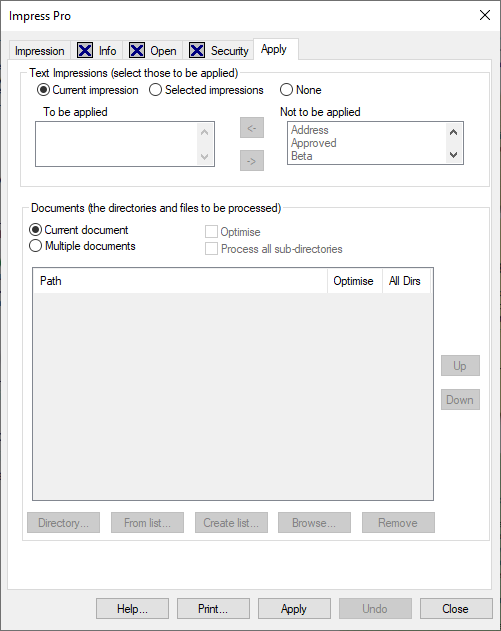
9. Next you need to enter the names of the files you wish to stamp with your chosen impression. For example you could select four of your
testfiles: testfile6.pdf, testfile7.pdf, testfile8.pdf and testfile9.pdf.
10. The Impress Pro dialog should now look something like the following:
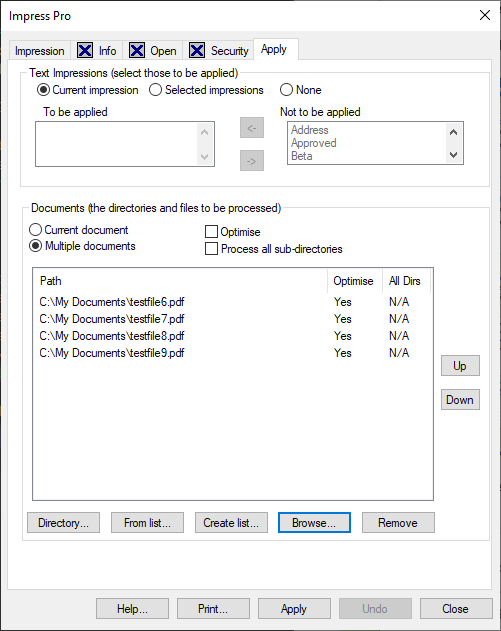
11. Files will be stamped in the order in which they appear in this list. Use the Up and Down buttons to rearrange the files into the correct order, in this case testfile6 through testfile9 in numerical order.
12. Click Apply to stamp page numbers onto all four files starting with Page 1 and continuing with no break in the sequence until the last page in the last file is reached. For example, if all files have 10 pages each and you stamp in the order testfile6, testfile7 testfile8 and finally testfile9, then the pages in testfile6 will be stamped Page 1 to Page 10, those in testfile7 will be stamped Page 11 to Page 20, those in testfile8 will be stamped Page 21 to Page 30, while those in testfile9 will be stamped Page 31 to Page 40.
| The next time you use this particular numbering sequence, page numbering will automatically start from Page 41 so allowing you to add additional documents into this particular sequence. If you want to start afresh on a new set of documents with this particular numbering sequence you must remember to re-set the Current Value field in the Create Serial Number Field dialog box. |
Any page numbering information already found within any of the files stamped with the new numbering sequence will be retained. However, an Acrobat plug-in, MaskIt is available for purchase from the Mapsoft web site which allows you to hide any existing page numbering information already found in any of the files before stamping the new numbers.
Controlling an Impressions Appearance
Options in the Font and Color fields control the appearance of your impression.
Font
Options in the Font field control the font settings to be used for your impression.
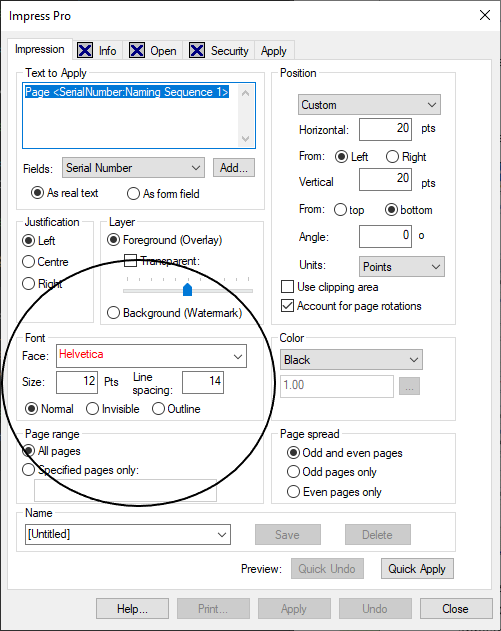
Any installed font available on your system can be used in an impression: these appear in black in the Face field. In addition any of Acrobats base fonts can also be used in an impression: these appear in red in the Face field. If you select a font that is available on your system but is not one of the ones already found within the file to be stamped, that font will be embedded into that file upon stamping that impression. Acrobats base fonts do not need to be embedded into the PDF file as they are always provided with Acrobat
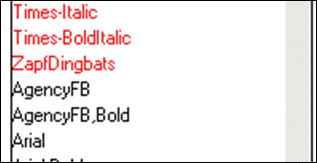
Face | The typeface of the text used in your impression, for example Helvetica. Make your selection from the drop-down list associated with this field, as below. You will notice that the base Acrobat fonts, such as Helvetica, appear in red in the drop down list, while the system fonts available for selection are shown in black. |
Size Line Spacing Normal Invisible Outline | The point size of the text as it appears in your impression. The vertical distance in points between the bases of the lines of text in points. This is also known as leading. This is automatically re-set whenever you change the Size setting but you can set you own setting here if you wish. The font appears as solid text, that is, it is filled. For example: Normal The text will not be visible on the page when it is viewed or printed, but it Outline text is text that is not solid. Text is drawn with an outline only:
|
Color
The Color field allows you to set the color of your impression.
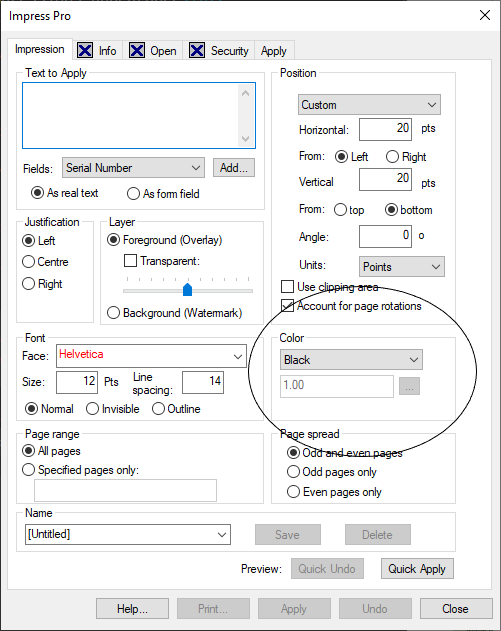
Make your selection from the drop-down list associated with this field.
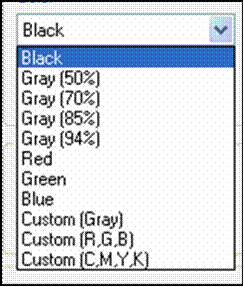
Customised Colors
If you choose one of the three Custom colors, (Gray, R,G,B or C,M,Y,K) you can type in the individual gray, red/green/blue, or cyan/magenta/yellow/black values into the box at the foot of the Color field. Custom values should be in the range 0.00 to 1.00 and commas must separate each individual entry.
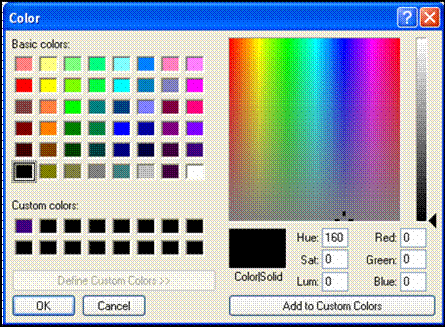
Additionally, if setting the RGB custom color you can also enter the value you want using a color palette. To do so select the Custom (R,G,B) option from the Color field and then click the button to display the following standard color dialog from where you can make your selection.
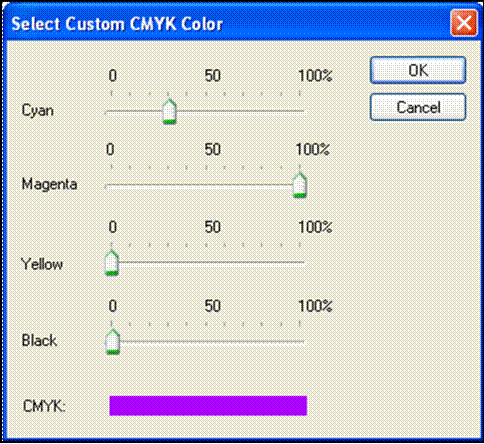
Similarly you can choose a color using the CMYK color scheme. To do so select the Custom (C,M,Y,K) option and then click the button to display the following color dialog from where you can make your selection by moving the sliders to create the exact color you wish to use.
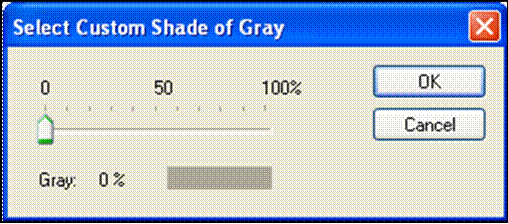
You can also select the exact shade of Gray you require from the following dialog box rather than entering the value manually. Clicking the button with the Custom (Gray) option selected displays the dialog box shown below. Move the slide to select the shade of gray required.
Positioning an Impression
Options in the Position, Justification and Layer fields control where an impression is stamped on a page, and whether it appears above the existing text or as a watermark.
Justification
The Justification field controls the alignment of an impression.
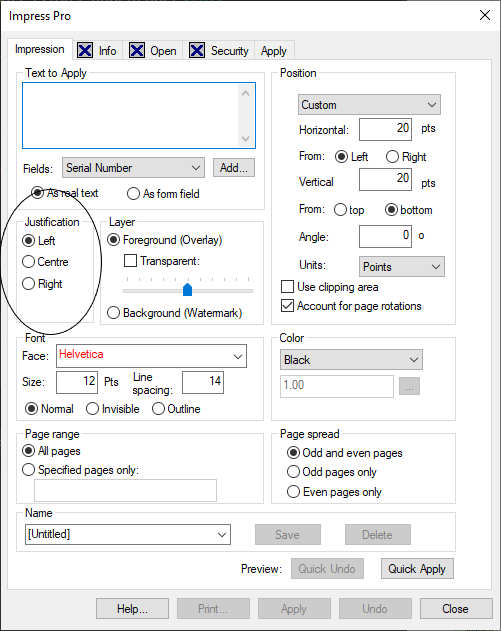
It can be aligned in one of three ways horizontally, Left, Centre or Right in relation to the Horizontal (X) co-ordinate specified in the Position field. This co-ordinate refers to the position of the text in relation to the bottom left/centre/right of an impression to the top left or bottom left corner of the page (see Positioned Exactly).
Left Centre Right | The text is left aligned in relation to the specified co-ordinate. This is the default setting.
The text is centrally aligned in aligned in relation to the specified co-ordinate. The text is right aligned in relation to the specified co-ordinate.
|
Layers
The Layer field controls whether the
impression is stamped on the foreground or the
background of the specified page(s).
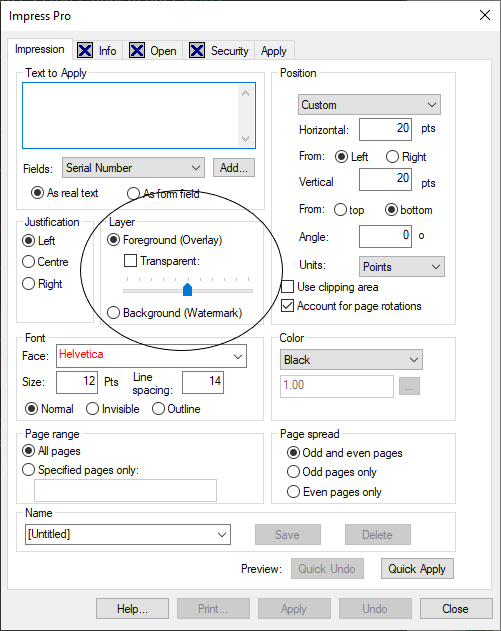
Foreground (Overlay) Background (Watermark) | The impression is stamped in the foreground of the page(s). Optionally, your impression can be stamped as a transparency. This means that the text beneath the impression can still be seen/read. Move the slider to the left to make the text more transparent (that is, fainter) or to the right to make the text less transparent (that is, bolder). The impression is stamped as a watermark. Watermarks appear behind the existing document text. You might want to use text such as Draft Sample, Approved, Confidential as watermarks. For example:
Note that some documents put a background color behind their text. Watermarks may not work in such situations. Instead, either use the font in outline mode or use the transparency option to stamp in the foreground. |
Position
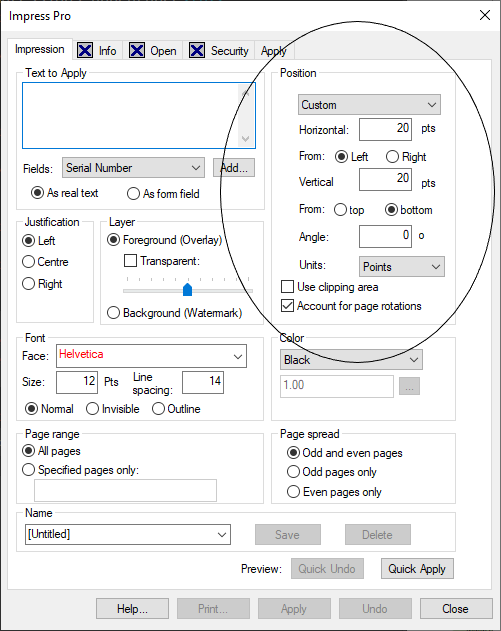
The Position field controls the horizontal and vertical positioning of the impression within a page, and the angle at which it displays.
Positioned Diagonally
If you select either the Diagonal from top left or Diagonal from bottom left options your impression is stamped diagonally across the page/clipping area from the top or bottom left of your page/clipping area depending on the option selected. Impress Pro will automatically work out the necessary co-ordinates to mark your impression diagonally from the bottom left or top left of a page/clipping area (depending on your selection) as in the following example:
|
|
Impressions stamped using either of these two options will always be positioned across the centre of the page/clipping area. The angle of such impressions will differ depending on the actual page size or clipping area size. This feature is particularly useful for files that contain pages of differing sizes or orientation.
Positioned Exactly
If you prefer you can pin-point the exact position and angle at which your impression is to be stamped by using the Custom options.
Horizontal Vertical Angle Units From | The horizontal (X) position of the text. This is calculated from the left or right of the page/clipping area depending on the From option selected. The vertical (Y) position of the text. This is calculated from the top or bottom left hand edge of the page/clipping area depending on the From option selected. It will increase downwards, for impressions calculated from the top, and increases upwards for those calculated from the bottom. The angle at which the text will display. The units of measurement. These can be either Points, Inches or Centimetres. Determines if the Horizontal (X) and Vertical (Y) co-ordinates specified are |
The Units field controls the unit of measurement to be used in calculating the positioning of impressions. Their position can be calculated in inches, points or centimetres.
Clipping Area
Check the Use Clipping area check box if impressions are to be positioned by a documents clipping area rather than its actual size. The clipping area is the area that is shown on the screen rather than the actual media size of the document (e.g. Letter or A4). It is useful to use the clipping area rather than the media area if, for example, you have a document that has been cropped and does not fill the media size of the paper, but you want the impression to be stamped in relation to the cropped area rather than the media area.
The cropped area could be positioned anywhere on the media so it may be useful for the co-ordinates of the impression to be calculated separately from the co-ordinates of the media.
The following diagrams show the effect of using the clipping area or of not using it. Images 1 and 2 show a document that has been stamped when the Use Clipping
Area option has NOT been selected.
| 1Printed version | 2Screen version |
Images 3 and 4 show the same document when it has been stamped with the Use Clipping Area option
selected.
| 3Printed version | 4 version |
Page Rotations
The Account for Page Rotations check box controls whether Impress Pro compensates for any rotated pages within the PDF file when stamping impressions on that file. When this check box is checked (which is the default setting) Impress Pro automatically rotates impressions on rotated pages to ensure they appear the right way up. For example, pages could have been scanned upside down on a
scanner so resulting in pages in the PDF file that have been rotated through 180. If this check box was not checked, impressions intended for the bottom of a page would be stamped upside down and at the top of the page. However, with this check box checked, impressions will be rotated by 180 so they will appear the right way up and will be positioned in the right place on the page.
This setting compensates for pages that have been rotated by 90 clockwise, 90 anti-clockwise and 180 clockwise. It may not always be obvious that pages have been rotated, which is why this feature is set on by default.
Specifying Page Ranges
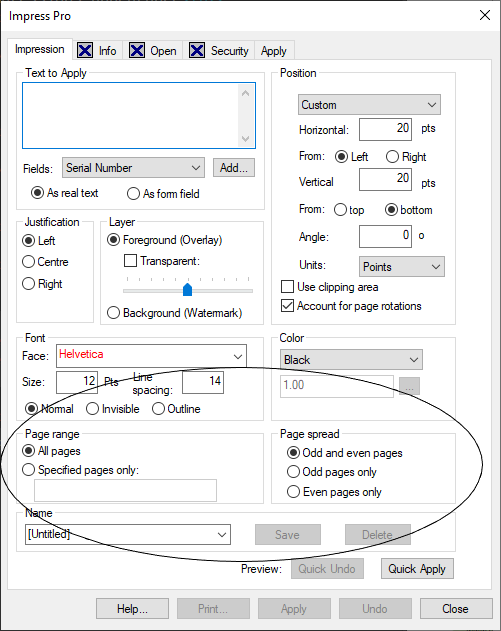
The Page Range and Page Spread fields control which pages are stamped with your impression.
Page Range
You can choose to mark the whole of your PDF document(s) with your impression(s), just the current page, or selected pages. Choose the All Pages option to stamp all the pages within the PDF file, the Current button to stamp the current page, or the Specified Pages Only option to stamp selected pages only. If you select the Specified Pages Only option you can then type the numbers of the pages you want to mark with the impression into the text box at the foot of this field.
You can mark non-contiguous pages, and/or ranges of pages with your impression. To mark individual non-contiguous pages type the page numbers of the relevant pages, separating each by a comma. For example to mark pages 6, 12 and 15 type:
6, 12, 15
| Any spaces are ignored so you can enter them or not, whichever you prefer. |
You can also specify a range of pages to be marked with your impression. To do this type the starting and ending numbers in the range, separated by a hyphen. For example to mark pages 3 through 19 of your document type:
3-19
If you omit the first number in the range, the first page of the document is assumed. Similarly if you omit the last number the final page of the document is assumed.
Thus if you were to enter:
3-
All pages from page 3 onwards would be marked.
If you were to enter:
-15
Pages 1 through 15 would be marked.
You can specify both non-contiguous pages and ranges of pages at the same time. For example to mark pages 3, 8, 9, 10, 14, and 18 type:
3, 8-10, 14, 18
Specified ranges can overlap if you so wish. For example it is perfectly possible to enter two overlapping ranges such as:
5-10, 7-12
Once you’ve typed in a page range definition, if you subsequently click the All Pages button the page range definition is retained so making it easy to go back to it should this be required.
Page Spread
This option specifies the page spread (of pages lying within the specified page range) to be marked with the impression.
Odd and Even Pages Odd pages only Even pages only | Stamps all pages within the specified range. This is the default. Only odd pages within the specified range are marked. Only even pages within the specified range are marked. |
Saving an Impression
To save a new stamp/impression, simply enter a name for it into the Name field, then click the Save button.
You do not have to save an impression before using it to stamp a document, but you will not be able to re-use it in another session of Impress Pro unless you do so.
You can delete any existing Impress Pro impressions by selecting the appropriate one from the drop-down list in the Name field and then clicking the Delete button.
Applying Impressions
If stamping a single impression onto your current document the easiest way to actually apply the impression is by using the Quick Apply button located behind the Impression tab.
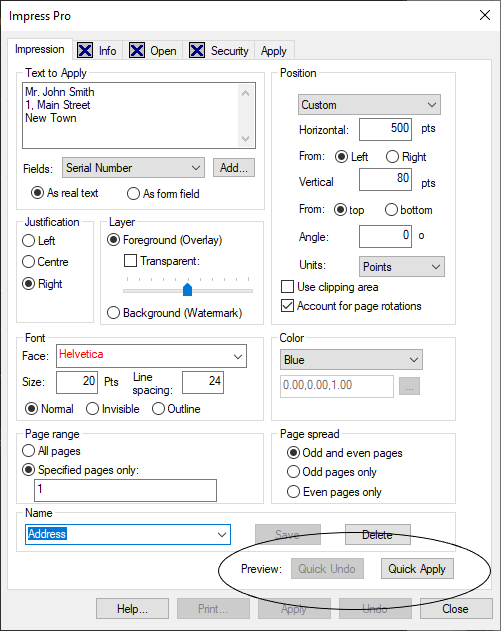
This then gives you the option of using the Quick Undo button to remove that impression from your file should the impression not have the effect that you wished. The Quick Undo facility is only available for use on the current file, which must have been stamped using Impress Pros Quick Apply facility during the current Impress Pro session. It cannot be used if stamping multiple files. However, it can be used to undo more than one impression in the current file, provided each was applied in the current session of Impress Pro. Each time you select the Quick Undo button, the previously applied impression will be removed in reverse chronological order.
However, the Quick Apply function is only available for stamping one impression onto the current file. If stamping multiple impressions onto a file, or working with more than one file at a time, you will need to use options behind the Apply tab.
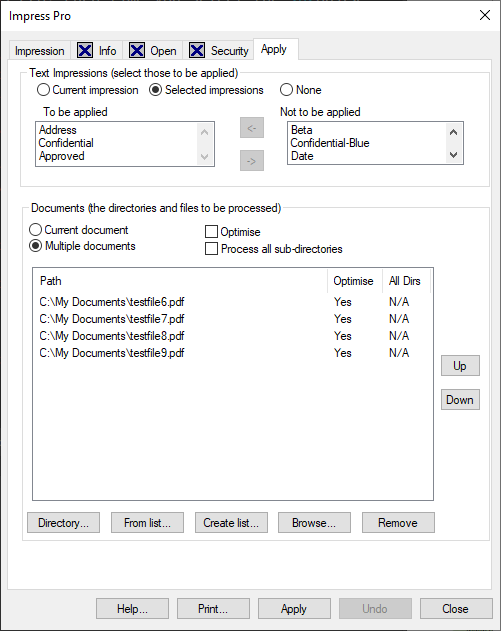
Here you can select the documents and/or impressions you wish to work with. The options available here are described in the following sections.
Selecting Impressions
You can choose to stamp the selected document(s) with:
q The current impression
Select the Current Impression radio button to stamp the selected PDF file(s) with the current impression.
q Multiple impressions
Select the Selected Impressions radio button to stamp multiple impressions on the selected file(s). See below for details.
q No impressions
Select the None radio button if you want to use Impress Pro just to set document attributes without stamping any impression(s). See Chapter 4 Setting Document Attributes for details.
Selecting Multiple Impressions
Selecting the Selected Impressions radio button activates the To be applied and Not to be applied fields, allowing you to select those impressions with which you wish your document(s) to be stamped.
All the currently available impressions are listed in the Not to be applied field as in the example below.
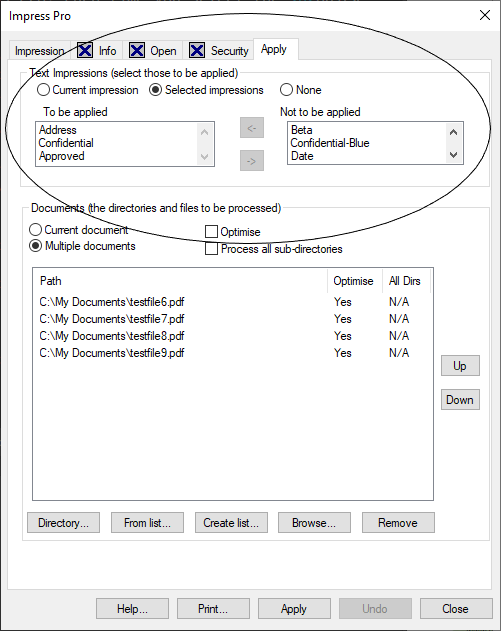
Click the name of an impression you require in the Not to be applied field and then click the left-facing arrow located between this field and the To be applied field

This then moves the selected impression to the To be applied field. Simply repeat for each impression you require. If you accidentally select the wrong impression, then select that impression in the To be applied field and click the right facing arrow located next to that field to

move that impression back to the Not to be applied field.
Selecting Documents
The options in the Documents group control which documents and directories your changes will affect. You can choose to apply your impression to either:
q The current document
The Current document option (the
default) stamps the currently open PDF document with the selected
impression(s).
q Multiple documents
The Multiple documents option allows you to specify multiple documents to be stamped with your selected impression(s). See below for details.
Selecting Multiple Documents
Selecting the Multiple documents option enables further options that allow you to specify the names of those documents on which your selected impression(s) should be stamped.
There are a number of ways in which you can enter the file names, use:
q Drag and Drop to select the relevant files.
q the Browse button to select the files.
q The Directory button to select a complete directory. The selected impression(s) will be stamped on all the PDF files (with the extension .PDF) in that directory.
q Use the From List button to select all the files or directories from a list. The file can be comma or line delimited.
Regardless of the method you used to select the appropriate files, these files will then be listed in the Impress Pro dialog box as illustrated below:
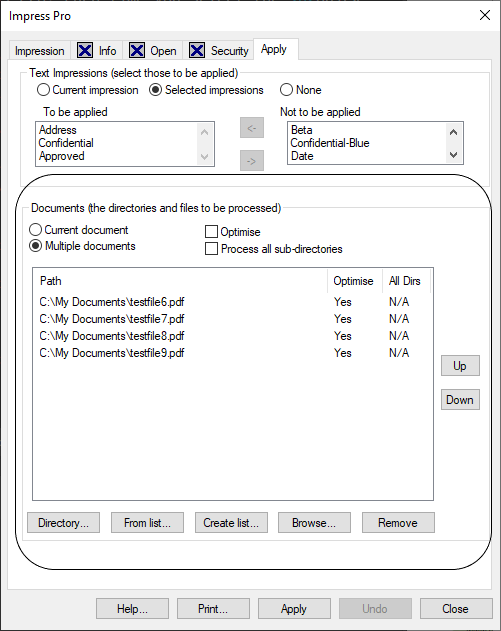
You can re-order the list of files by using the Up and Down buttons. Simply select one of the file entries shown in the list and then select either the Up or Down button as appropriate to move that file up or down the list. Repeat until the files are shown in the order in the correct order. This feature is particularly useful when stamping serial numbers across multiple files.
You can also set the Optimise and Recurse to Subfolders options as required.
Optimise | the file will be saved in a format which will facilitate efficient viewing on the internet. The effect of which will usually cause a reduction in file size and the contents to be restructured to enable page at a time downloading (Byte Serving). |
Recurse to subfolders | Impress Pro will not only search the directory you selected, but also any child folders located inside the main directory for valid PDF files. |
You can also save a list of files for use with another impression by selecting the Create List button. This allows you to output the file list currently shown within Impress Pros dialog box to a text file. On selecting the Create List button a dialog box appears from where you can specify the name and location of this text file. You could then re-import this file list using the From List button whenever you wished to do so
4: Setting Document Attributes
Document Attributes
In addition to offering support for stamping text and images onto PDF files, Impress Pro can also be used to set various standard document attributes for your output PDF files, namely:
q Document information about a PDF file Controlled by options behind the Info tab in Impress Pro‘s dialog box.
q Default appearance of PDF files when they initially open Controlled by options behind the Open tab in Impress Pro’s dialog box.
q Standard security options for PDF files Controlled by options behind the Security tab in Impress Pro’s dialog box.
You can set any (or all) of the above document attributes when stamping a file with an impression. However, these attributes can also be set completely independently from marking an impression, so giving you the ability to use Impress Pro just for setting document attributes. If you do make changes to any of these options a tick (check mark) will appear next to the relevant tab in the Impress Pro dialog to indicate changes have been made.
You have the option to set the default entries for any of the fields located behind any of these tabs. This is particularly useful if you always enter the same information into any of these tabs: saving your own particular configuration for that tab will save you time.
As is the case when using Impress Pro for marking impressions, you can set document attributes for multiple documents.
Setting Document Information
You can use Impress Pro to set document information pertaining to your PDF document(s) by using options available behind the Info tab in the Impress Pro dialog box.
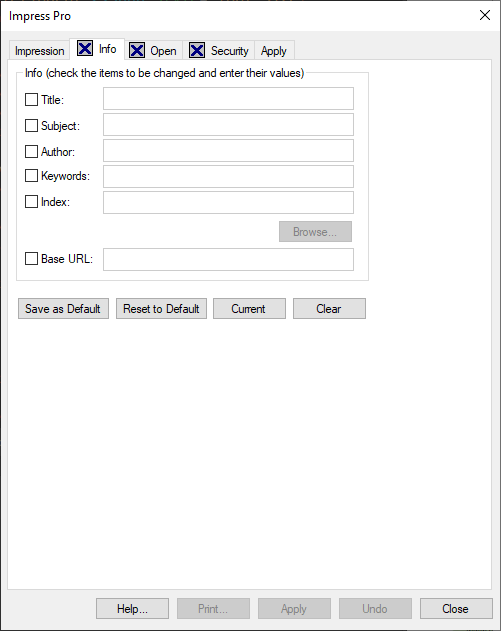
Here you can set or change the standard document information fields listed below:
q Title
q Subject
q Author
q Keyword
q Index
q Base URL
To set any information you enter as the default option for a particular field, simply click the Save as Default button when you have made your entries. Any entries set as default ones will be set automatically each time you use Impress Pro. (A tick (check mark) will appear next to the Info tab each time you open Impress Pro to remind you that some of the options behind that tab have been pre-set.)
| The Save as Default functionality is also available for the Open and Security tabs. |
You can use the Reset to Default button to re-set any fields back to their default setting during an Impress Pro session. You can also click the Current button to set the options to be the same as those currently set for the currently open document.
To set document information for the current document:
1. Open the PDF document whose document information properties you wish to set.
2. Select Plug-Ins > Impress Pro… within Acrobat to display the Impress Pro dialog box.
3. Click the Info tab.
4. Click the check boxes next to any of the options you wish to change and insert your new text. For example you might want to set a documents name or the name of its author.
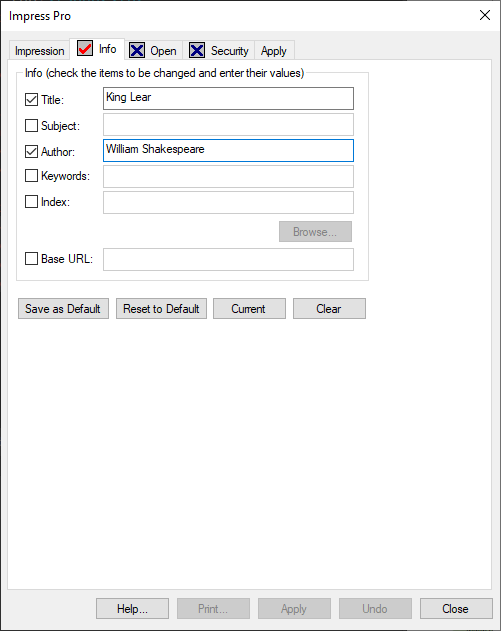
| The cross next to the Info tab has now changed to a tick (check mark) to indicate you have made changes in this area |
If attaching an Index
to your PDF document you can use the Browse button to search for the index
you require.
5.
Optionally, clicking
the Save as Default button will save
any entries you have just made as the default settings for those particular
fields.
6.
Click the Apply tab.
7.
Click the None option, if you are not actually
stamping any impression followed by the Apply button to apply your changes.
Controlling a
Document’s Appearance
You can use Impress Pro
to change the default appearance of PDF file(s) when they are opened. To do
this you use options available behind the Open tab in the Impress Pro dialog box.
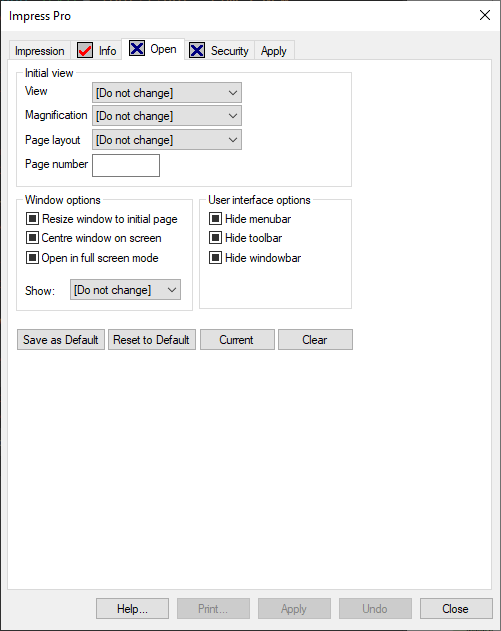
The following options are available for selection.
| The default settings referred to here are those that have been pre-set for Impress Pro. You can change any of these default settings if you wish by clicking the Save as Default button at the foot of this dialog once you have made your changes. |
Initial view | Determines the way in which your document displays when it is opened. You can set: |
Window Options | Sets various options controlling the size and appearance of the window in which your document displays when it is opened: |
User Interface Options | Sets various options controlling the appearance of the user interface in which your document displays when it is opened. You can hide any or all of the following by clicking on their associated check box: |
To set the appearance of the current document:
1. Open the PDF document whose appearance you want to change.
2. Select Plug-Ins > Impress Pro… from within Acrobat, to display the Impress Pro dialog box.
3. Click the Open tab.
4. Select the options you require from the drop-down lists associated with the View, Magnification and/or Page Layout fields.
| The cross next to the Open tab has now changed to a tick (check mark) to indicate you have made changes in this area. |
5. Enter the page number of the first page you wish to be displayed if it is anything other than the first page in your document in the Page number field.
6. Check those options from the Window options group that you wish to set.
7. Check those options from the User interface options that you wish to set.
8. Optionally, clicking the Save as Default button will save any entries you have just made as the default settings for those particular fields.
9. Click the Apply tab, followed by the Apply button. (You will obviously have to save, close down and open up the file to see the result.)
You can specify the default appearance of multiple PDF documents not just one.
Setting Security Options
You can set standard security options for your PDF document(s) using Impress Pro. You do this using options behind the Security tab in the Impress Pro dialog.
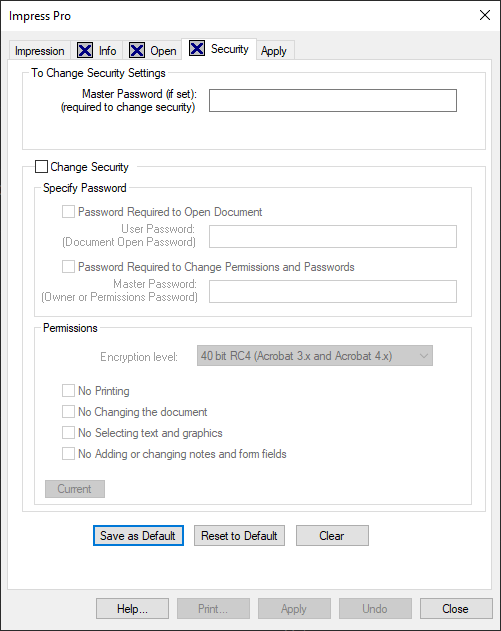
Here you can set the same security information as you can within Acrobat, so controlling access to your document(s). If a file already has a security password set you must enter the current password into the Password field. If you do not, any new passwords you set will not take effect. If a security password has been set and you do not know what it is, you will not be able to change the documents security settings. If a document has been set up so as not to allow a document to be changed, you will not be able to use Impress Pro to stamp that document without the correct security password.
To set security options for the current document:
1. Open the PDF document for which you wish to set security options.
2. Select Plug-Ins > Impress Pro… within Acrobat to display the Impress Pro dialog box.
3. Click the Security tab.
4. Check the Change security settings check box if you want to set a password for either opening the document or changing any of its security options.
5. Enter your required passwords into the Open the document and/or Change security options fields.
| The cross next to the Security tab has now changed to a tick (check mark) to indicate you have made changes in this area. |
6. Check any of the options you require in the Do not allow group.
7. Optionally, clicking the Save as Default button will save any entries you have just made as the default settings for those particular fields.
8. Click the Apply tab.
9. Click the None button if using Impress Pro to simply set security information.
10. Click the Apply button.
11. You are asked to re-enter the password(s) you just set for verification purposes.
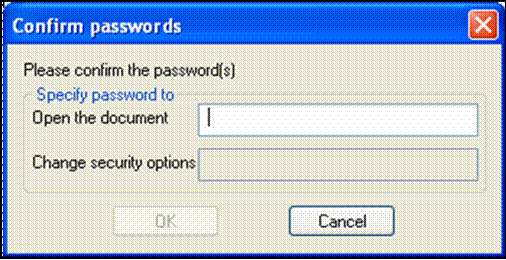
12. Re-enter the appropriate password(s) and click OK.
Once you have saved your PDF files with security settings, it will not be possible to open them and/or change the specified security options unless the correct password is known.
Security options can be set for multiple files, in which case all files opened in the same batch must have the same security settings.
| If you enter a security password, leave the security options fields empty, and apply and save the document, any security information that was previously set in that document will be removed. |
5: Frequently Asked Questions
FAQs
Why do some watermarks not appear?
Some PDF files are created with a white background behind the text. Also foreground images may obscure the whole background of the page.This is particularly true when PDF files are created from scans.In these situations outlined text can be used in the foreground. Alternatively, Impress Pro’s transparency feature can also be used when using Acrobat 5 and above.
Why does text sometimes disappear from the top and bottom of variable sized pages in a PDF file?
When using variable sized pages is important to ensure that the calculations for the positioning of impression are done either from the top, bottom, left or right of the page. The PDF co-ordinate system works from the bottom left-hand corner of the page. For this reason footers should be calculated from the bottom and headers should be calculated from the top.
Is it possible to use drag-and-drop to the file window in the Apply tab?
Impress Pro supports the drag-and-drop selection of files from the Windows Explorer.
Is it possible to use the document information, security options and open defaults without applying an impression?
Yes it is. Just select None in the Apply tab and then run Impress Pro.
Is possible to apply multiple lines of text at once?
Impress Pro supports multiple lines in a single impression. In the text entry field just use the enter key (return key) to create a new line. The line spacing is defined by setting line spacing. The line spacing value should be the height of the font plus the amount of space that you wish to see between the lines. If you wish to apply several lines of text with different attributes, then you should do this by creating several impressions, saving them and then applying multiple impressions in the Apply tab.
Does Impress Pro support legal page numbering with leading zeros?
Version 2.0 of Impress Pro introduced support for Bates page numbering. This is in the form 000001 where any number up to 6 digits is preceded by zeros. So, for example, page number 1000 would be written as 001000 when using this numbering system. If you need to vary the width of this field then you can do so using the serial numbering feature.
Does Impress Pro make changes to the security, Open defaults and Information Fields in my PDF files?
Changes are ONLY made to these settings if specifically set by the user. Because Impress Pro supports batches of PDF files these other features have been added to the product to provide common functions that are often applied to PDF files.
A: Setting Special Fields Manually
Special Fields
In earlier versions of Impress Pro the special field codes relating to variable data such as page numbering, page count and date/time information etc, could only be set manually. In the latest version of Impress Pro they can now be set automatically via Impress Pros user interface. This is now the recommended method for setting variable data. See Including Variable Data in Chapter 3: Working with Impressions for details. However, for consistency with earlier versions of Impress Pro support for setting these fields manually remains and thus details on how to do this are given below.
Setting Special Fields Manually
Special fields can be included in the Text field in the Impress Pro dialog box for either multiple or single documents. Such fields must be delimited by the < and > characters within your text, which identifies them as special fields:
<field>
Only pre-determined entries are permitted, these are all described in this section. In addition, some of the special fields can also be used in conjunction with parameters, in which case they have the format:
<field:parameter(s)>
When variable data is set via the options found in the Fields field (which is the recommended method), Impress Pro automatically generates the appropriate field code(s) for you.
Date and Time Stamps
The following fields are supported for stamping your PDF file with date and/or time information.
Field | Meaning | |
<Date> | Local date | |
<DateUTC> | Co-ordinated Universal Time date | |
<Time> | Local time | |
<TimeUTC> | Co-ordinated Universal Time time | |
You can specify any of the parameters shown in the table below with any of the above date and time fields.
Parameter | Meaning | |
%a | Abbreviated weekday | |
%A | Full weekday name | |
%b | Abbreviated month | |
%B | Full month name (locale-dependent) | |
%c | Date and time | |
%d | Day of the month | |
%H | Hour -24-hour clock | |
%I | Hour -12-hour clock | |
%j | Day of the year | |
%m | Month (01-12) | |
%M | Minute (00-59) | |
%p | AM/PM indicator | |
%S | second (00-61) (Yes, | |
%U | the week number of | |
Parameter | Meaning | |
%w | Weekday (0-6), where | |
%W | Week number of the | |
%x | Date used as the | |
%X | Time used as the | |
%y | Year without century | |
%Y | Year with century | |
%Z | time zone name or | |
%% | A percent character | |
Page Numbering
The following fields are supported for stamping your PDF file with page numbering information.
Field | Meaning | |
<PageNumber> | Page Number, starting | |
<BatesPageNumber> | Page Number in Bates | |
Page Count
The following field is supported for stamping your PDF file with page count information.
Field | Meaning |
<PageCount> | Page count, starting from 1 |
File Name
The following fields are supported for stamping your PDF file with the file name information.
Field | Meaning |
< FileName> | File name only (without the file extension) |
< PathName> | Full path name |
< FileNameExt> | File name with extension |
Information Fields
The following fields are supported for stamping your PDF file with the following PDF document information.
Field | Meaning | |
<Title> | General Document Info Title field contents | |
<Author> | General Document Info Author field contents | |
<Subject> | General Document Info Subject field contents | |
<Keywords> | General Document Info Keywords field contents | |


