Impress
An Adobe Acrobat plugin that enables you to stamp text on PDF files quickly and professionally.
Overview
Impress is a specialized Adobe Acrobat plugin designed to streamline the process of stamping text onto PDF documents. Whether you need to mark documents as "Draft", "Confidential", "Approved", or apply custom text overlays, Impress makes it fast and effortless.
Built to integrate seamlessly into your existing Adobe Acrobat workflow, Impress gives you full control over text placement, appearance, and formatting — all from within the familiar Acrobat interface.
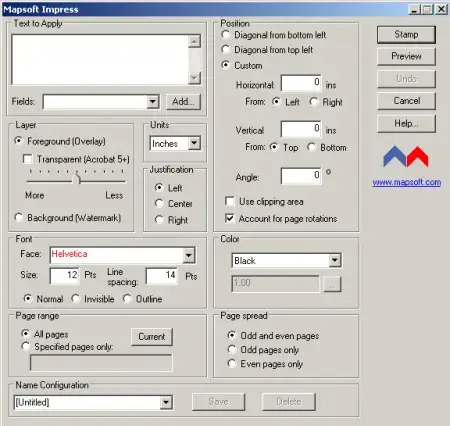
Key Features
Everything you need to stamp text on PDF files with precision and ease.
Custom Text Stamping
Add any text to your PDF pages, including custom messages, dates, document status labels, and more.
Quick & Efficient
Stamp text on PDF files in seconds, saving valuable time in your document workflow.
Flexible Positioning
Place your stamp exactly where you need it on the page with precise positioning controls.
Font & Style Control
Choose from a wide range of fonts, sizes, and colours to match your branding or document requirements.
Transparency Options
Set stamp transparency so text overlays blend naturally without obscuring document content.
Rotation Support
Rotate your text stamps to any angle — ideal for diagonal watermarks and angled labels.
Common Use Cases
- Mark documents as "Draft", "Confidential", "Final", or "Approved"
- Apply watermarks to protect intellectual property
- Add revision numbers and dates to technical documents
- Stamp page numbers or custom identifiers
- Add disclaimers or legal notices across pages
Resources
Get started with Impress using the guides and downloads below.
User Guide
Complete documentation covering all features and configuration options for Impress.
Impress vs Impress Pro
Not sure which version you need? Here's a quick comparison.
Impress $129
- Stamp text on PDF pages
- Precise positioning and rotation
- Font, size, and colour control
- Transparency options
- Page range selection
Impress Pro $199
- Everything in Impress, plus:
- Multiple text stamps at the same time
- Batch processing across multiple files
- PDF Information fields — fill document metadata
- Open Options — set initial view, page layout, and magnification
- Security Settings — set passwords, permissions, and encryption
System Requirements
Adobe Acrobat
Adobe Acrobat Pro or Standard (DC, 2020, or 2017). Not compatible with Adobe Acrobat Reader.
Operating System
Windows 10 or Windows 11 (64-bit recommended). Both 32-bit and 64-bit Acrobat installations are supported.
Licence
Perpetual licence with free maintenance period. See licence details and upgrade policy.
See It in Action

Related Products
ImagePlacer
Place images, logos, and watermarks on PDF pages with pixel-perfect precision — complements Impress for mixed text and image overlays.
Ready to Stamp Your PDFs?
Get in touch to learn more about Impress or explore our full product range.