
Mapsoft MaskIt
A Publishing Tool for use with Adobe Acrobat and Acrobat DC
(Version X upwards)
Running under WindowsTM Operating Systems
Issue 4
January 2024
This publication contains proprietary information that is protected by copyright. The information contained in this publication is subject to change without notice. Considerable effort has been made to ensure that this manual is free of inaccuracies or omissions, but Mapsoft Computer Services Limited assumes no responsibility or liability for any errors or inaccuracies that may appear herein.
Mapsoft Computer Services Limited shall not be liable for any direct, incidental or consequential damages of any nature, or losses or expenses resulting from the use of this material.
Adobe and Acrobat are trademarks of Adobe Systems Inc which may be registered in some jurisdictions.
Microsoft is a registered trademark and WindowsTM and is a trademark of Microsoft Corporation.
Other brand or product names are the trademarks or registered trademarks of their respective holders.
1998 -2024 by MAPSOFT COMPUTER SERVICES LIMITED. All rights reserved in all countries.
15 Erme Court
Leonards Road
Ivybridge
Devon PL21 0SZ
United Kingdom
Tel: +44 (0) 2032 900473
email: support@mapsoft.com
Introduction
MaskIt is a masking tool which allows you to mask areas of pages within PDF documents so that anything that would normally display or print in that portion of the page will no longer be visible to the user. The tool can be used to hide sensitive information (such as credit card details/personal information) or material which is out-of-date. It is particularly useful for cleaning up the edges of dirty scans or images.
While this tool hides page content, unlike Acrobats Crop Pages function it does not actually alter the physical dimensions of a page.
The information you hide using MaskIt remains hidden in the document: the content is not destroyed only hidden. The user cannot see information hidden using the MaskIt tool, although it may be possible for the user to search for this information or to select hidden text using some text tools. Using Acrobats Security options will help to prevent this.
MaskIt can hide page content from either:
♦Inside a defined area, such as a graphic or logo
♦Outside a defined area: for example, to remove headers and footers from a page but leave everything else on the page intact
MaskIt will automatically make adjustments for any pages that have been rotated by 180 (i.e. are upside-down). This feature is particularly useful if you want to remove page numbers from a document where some of the pages are upside-down.
Once defined, masks can be applied to the current document and/or saved for future use either with MaskIt itself or with Mapsofts unique batching tool, Automator. MaskIt can only be applied to a single document at a time, but when used in conjunction with Mapsoft Automator, MaskIt can be used to mask information in multiple files in one operation. (Automator can be purchased from the Mapsoft web site, mapsoft.com.)
MaskIt can also be combined with other Mapsoft publishing tools in a single batch operation across single or multiple files when used with Automator. For example, you might want to mask existing page numbering information found across a series of files using MaskIt, and then use Mapsoft Impress to stamp new sequential page numbering across all the files in that series. A full list of all available Mapsoft publishing tools can be found on the Mapsoft web site, mapsoft.com.
The following sections show how you can use MaskIt to create new masks, and how you can use this tool to apply previously defined masks.
You are strongly advised to take backups of your files before running MaskIt as once you have applied your masks and saved your PDF files, you will not be able to subsequently remove the masks from those files.
Creating a New Mask
To create a new mask and apply it to the current document:
1.Open the PDF document to which you wish to apply a mask.
2.Select the Activate MaskIt tool from Acrobats main button bar.
The MaskIt icon can also be accessed from Acrobats Advanced Editing Toolbar. To make this toolbar visible, select the View menu option, followed by Toolbars followed by Advanced Editing.
Once the MaskIt icon has been selected the mouse cursor will then change to a cross-hair shape to indicate this tool is active.
3.Move the mouse cursor to the point at which you wish one of the corners of the masking area to start.
4.Press down the left mouse button and drag a bounding box around the area you wish to define. Depending on options you select in the MaskIt dialog box, either all content inside this defined area will be masked (the default), or all content outside the defined area will be masked.
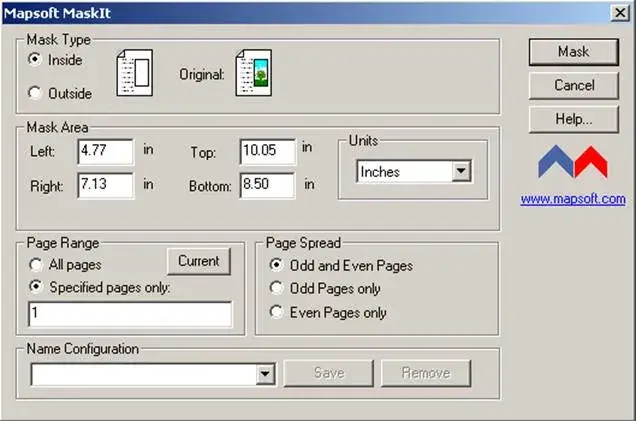
5.Release the left mouse button when you have finished selecting the area. The Mapsoft MaskIt dialog box (illustrated below) will then display.
See MaskIt Options below for full details on all the options available in this dialog box.
- Select the required Mask Type. This can either be Inside in which case all the page content inside the bounding box will be hidden, or Outside in which case all the page content outside the bounding box will be hidden leaving just the content inside the bounding box visible.
7.The Mask Area group controls the actual area of the page that will be used with this mask. The fields in this group will have already been filled in automatically using the co-ordinates of the area you selected with the bounding box (at step 4 above). (As illustrated in the above example screen snap.) You can however alter these co-ordinates manually if you wish to mask a different area of the screen.
8.Enter the PageRangedetails. Your mask will be applied to the pages you specify here. You can choose to apply your mask to the Current page only, All Pages or Specified Pages Only. If you choose Specified Pages Only you will then have to enter the actual page range information into the text box next to this field. See Specifying Page Ranges below for full details on specifying the range of pages to which your mask is to apply.
9.Enter the Page Spread details. You can choose to apply your mask to Odd and Even Pages, Odd Pages Only or Even Pages Only within the specified range of pages.
10.Optionally, enter a name into the Name Configuration field and click the Save button to save this mask with the settings you have just chosen. This will allow you to re-use this particular mask again without needing to re-define it. See the next section, Applying an Existing Mask for details on how re-use an existing Mask.
You can also use all saved MaskIt configurations with Mapsoft Automator, so allowing you to apply masks across multiple documents, or libraries of documents in a single batch operation.
11.Click the Mask button to apply the new mask to the current document, so masking the selected contents within that file.
The selected pages within the current document are now masked with the new mask you just created.
You can also create a mask for future re-use without actually masking a document with it now. To do so, follow the steps above but after step 10 click the Close button after saving the mask, instead of clicking Mask to apply the mask now.
Once information in your PDF document has been hidden using MaskIt, you can revert to the original document by using Acrobats File > Revert options, provided you have not yet saved the new (masked) version of your PDF file. However, once you have saved the document you will not be able to remove any masks inserted within it by MaskIt.
|
Any annotation objects within a PDF file that have been created directly within Acrobat will not be masked. However, it is possible to mask these objects by flattening them first using another of Mapsofts publishing tools, Flattener, before applying your mask. You could combine the use of Flattener and MaskIt together in one operation using Automator to make this a seamless operation. (Flattener and Automator can both be purchased from the Mapsoft web site, mapsoft.com.) |
Applying an Existing Mask
Once you have defined and saved a mask following the steps given in the previous section, those masks are then available for later re-use within MaskIt (or Mapsoft Automator).
To apply an existing mask to the current document:
- Open the PDF document to which you want to apply a mask.
- Select Plug-Ins > Mapsoft > MaskIt… from Acrobats main menu.
The Mapsoft MaskIt dialog box then displays.

3. Select the name of the mask you want to use from the drop-down list of available masks in the Name Configuration field as illustrated below.

Click the Mask button to apply the selected mask to the current document, or alternatively select Cancel to cancel this operation.
MaskIt Options
The MaskIt dialog box allows you to set various options to control the behaviour of the mask you are creating.
Mask Type | Controls the type of mask to apply. Two types of mask can be applied: |
Mask Area | The actual co-ordinates of the mask. The fields within this group are populated automatically, based on the bounding box you draw to represent your mask area. |
Page Range | Specifies those pages to which you wish the mask to apply: |
Page Spread | Specifies the page spread, of pages lying within the specified page range, to which your mask is to be applied: |
Name Configuration | The name under which your new configuration is to be saved. Saving a configuration ensures you can re-use it with MaskIt. Alternatively it also gives you the option of using this MaskIt configuration with the Mapsoft Automator tool, so allowing you to apply this mask to multiple documents in one single batch operation, or to combine the use of MaskIt with other Mapsoft publishing tools. |
You can save a masks settings without actually having to apply the mask to a document.
Mask | Click this button to apply the mask to the current document. |
Cancel | Click this button to close the Mapsoft MaskIt dialog box without actually applying the mask you have just created. (If you have already saved your current mask definition, this mask will be available for future re-use.) |
Specifying Ranges
When creating a new mask you can choose if that mask should be applied to the whole of a PDF document, or just selected pages within that document. If you want a mask to apply to only selected pages choose the Specified Pages Only option from the Page Range field in the Mapsoft MaskIt dialog box. You can then type the numbers of the pages you want to mask into the text box at the foot of this field.
You can mask non-contiguous pages, and/or ranges of pages. To mask individual non-contiguous pages type the page numbers of the relevant pages, separating each by a comma. For example to mask pages 6, 12 and 15 type:
6, 12, 15
Any spaces are ignored, so you can enter them or not as you prefer.
You can also specify a range of pages to be masked. To do this type the starting and ending numbers in the range, separated by a hyphen. For example to apply a mask to pages 3 through 19 of your document type:
3-19
If you omit the first number in the range, the first page of the document is assumed. Similarly if you omit the last number the final page of the document is assumed. Thus if you were to enter:
3-
your mask would be applied to all pages from page 3 onwards.
If you were to enter:
-23
your mask would be applied from the first page through to page 23 of your document.
You can specify both non-contiguous pages and ranges of pages at the same time. For example to apply a mask to pages 3, 8, 9, 10, 14, and 18 type:
3, 8-10, 14, 18
Specified ranges can overlap if you so wish. For example it is perfectly possible to enter two overlapping ranges such as:
5-10, 7-12
Once youve typed in a page range definition, if you subsequently click the All Pages button the page range definition is retained so making it easy to go back to it should this be required.