

Managing thousands of digital documents is a daily reality for every American enterprise, yet nearly 65 percent of IT managers report wasted storage and rising costs due to oversized PDFs. Reliable optimization is critical when vast document libraries must stay nimble without sacrificing quality or compliance. This guide breaks down smart, actionable strategies for preparing, compressing, and verifying PDFs with Adobe Acrobat Pro to help IT leaders control costs and speed up enterprise workflows.
Table of Contents
- Step 1: Prepare Your PDF for Optimization
- Step 2: Select Optimization Settings in Adobe Acrobat Pro
- Step 3: Apply Optimization and Compress Your PDF
- Step 4: Verify File Size and Document Quality
- Step 5: Automate Future PDF Optimizations
Quick Summary
| Takeaway | Explanation |
|---|---|
| 1. Optimize images to reduce size | High-resolution images significantly increase file size; downsample or compress them for better efficiency. |
| 2. Use batch processing for efficiency | The Action Wizard allows for automation of PDF optimizations across multiple files, saving time and ensuring consistency. |
| 3. Backup original files before changes | Always create a duplicate of the original PDF to preserve its quality in case optimization affects its integrity. |
| 4. Review quality post-optimization | Carefully check the optimized PDF for font clarity and image resolution to ensure essential details are maintained. |
| 5. Automate workflows for routine tasks | Design repeatable optimization workflows with Adobe’s Action Wizard to streamline and standardize your PDF management process. |
Step 1: Prepare Your PDF for Optimization
Before diving into PDF optimization, you need a strategic approach to minimize file size while maintaining document quality. Understanding the key components affecting PDF performance helps you make informed decisions about which elements to retain or remove.
Start by opening your document in Adobe Acrobat Pro and conducting a comprehensive audit. Check for large images, embedded fonts, transparency effects, and unnecessary metadata that could unnecessarily inflate your file size. Pay special attention to high resolution images and complex graphic elements that consume significant digital space. Remove redundant objects like duplicate content, embedded thumbnails, or unused layers that contribute to file bloat without adding value.
Prioritize backing up your original file before beginning any optimization process. This ensures you always have a pristine copy in case optimization changes compromise your document’s integrity or design. Carefully audit file space usage to identify which specific elements are consuming the most digital real estate and target those for potential reduction.
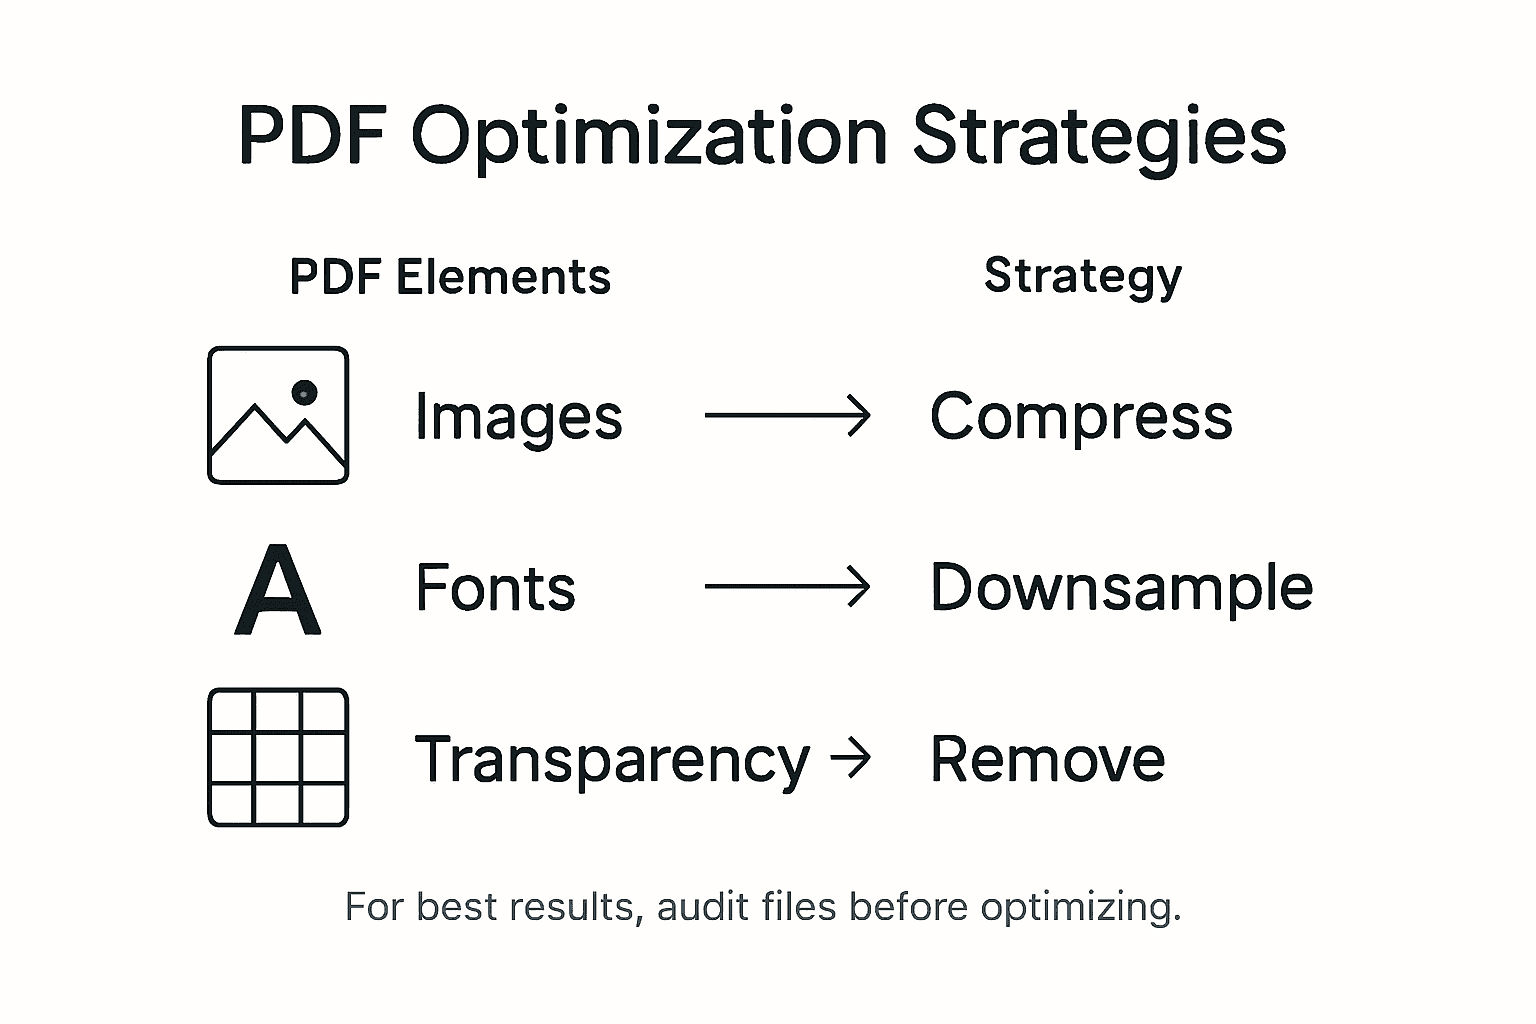
Here’s a summary of common PDF elements and their impact on file optimization:
| PDF Element | Typical Impact on Size | Optimization Strategy |
|---|---|---|
| High-res Images | Significant file growth | Downsample or compress |
| Embedded Fonts | Moderate increase | Subset or unembed unused |
| Transparency Layers | Large file size | Flatten layers |
| Metadata | Minor but cumulative | Remove unnecessary details |
Pro tip: Before optimization, create a duplicate working file to experiment with compression settings without risking your original document’s structure or content.
Step 2: Select Optimization Settings in Adobe Acrobat Pro
With your PDF prepared, you are now ready to fine-tune its optimization settings using Adobe Acrobat Pro’s powerful PDF Optimizer tool. Customizable settings allow you to balance file size and quality precisely, giving you granular control over document compression.
Navigate to the Advanced Optimization panel and explore the key configuration panels for images, fonts, transparency, and object management. Each panel provides specific options for reducing file size. For images, you can adjust downsampling and compression types like JPEG or ZIP while selecting quality levels that maintain visual clarity. When managing fonts, consider subsetting or unembedding unnecessary character sets. The transparency settings enable you to flatten complex layers, which can dramatically reduce file size and improve cross platform compatibility.
Accessing detailed optimization controls requires selecting Advanced Optimization from the toolbar and carefully examining each panel. Pay special attention to the compatibility dropdown, which allows you to set the specific Acrobat version target. This ensures your optimized PDF remains accessible across different software versions while minimizing digital footprint.
Pro tip: Create and save custom optimization profiles for different document types to streamline your workflow and maintain consistent compression standards.
Step 3: Apply Optimization and Compress Your PDF
With your settings configured, you are now ready to apply optimization and compress your PDF document. To begin the compression process, select ‘Compress a PDF’ from the toolbar in Adobe Acrobat Pro, which will launch the optimization wizard and help you reduce file size efficiently.

You have two primary compression options: single file optimization or batch processing for multiple documents. For individual files, choose ‘Advanced Optimization’ and review the settings you previously configured. Click ‘OK’ to apply the compression, then save your optimized PDF with a new filename to preserve the original document. When working with multiple files, leverage the Action Wizard to automate the compression process across entire directories, ensuring consistent file size reduction across your document collection.
Compare single file optimization versus batch processing for PDF compression:
| Method | When to Use | Benefits | Limitations |
|---|---|---|---|
| Single File | One-off documents | Precise settings per file | Time-consuming for many PDFs |
| Batch Processing | Multiple files/folders | Automates bulk compression | Less customization per file |
Utilizing the ‘Save as Other’ > ‘Optimized PDF’ function allows for precise control over compression parameters, enabling you to balance file size reduction with maintaining acceptable content quality. Pay close attention to the preview window, which provides real time feedback on file size reduction and potential quality impacts before finalizing your compression.
Pro tip: Always keep an uncompressed backup of your original PDF to ensure you can revert changes if the compressed version does not meet your quality standards.
Step 4: Verify File Size and Document Quality
After completing PDF optimization, your next crucial task is carefully evaluating the results to ensure your document meets performance and visual standards. Use Adobe Acrobat’s ‘Audit Space Usage’ feature to confirm precise file size reduction and element distribution, which provides comprehensive insights into your document’s compression effectiveness.
Carefully preview your optimized PDF in multiple view modes to assess font rendering, image clarity, and overall document integrity. Pay special attention to graphic elements and text legibility across different zoom levels. Compare the original and optimized versions side by side, checking that critical details remain intact while confirming significant file size reduction. Utilize Acrobat’s preview tools to examine how different compression settings impact visual quality, allowing you to make informed adjustments that balance file size and document presentation.
Analyzing compression outcomes involves comparing font fidelity, image resolution, and transparency effects before finalizing your optimization. If the compressed version shows any unacceptable quality degradation, return to your optimization settings and make incremental adjustments to find the optimal compression level that meets your specific requirements.
Pro tip: Create a standardized quality checklist with specific visual and performance benchmarks to consistently evaluate PDF compression across different document types.
Step 5: Automate Future PDF Optimizations
Streamline your document management by leveraging Adobe Acrobat Pro’s powerful automation capabilities. Create consistent PDF optimization workflows using the Action Wizard tool, which allows you to design repeatable sequences for batch processing multiple documents efficiently.
To set up your automation workflow, navigate to the Action Wizard and define a sequence of optimization tasks tailored to your specific requirements. Guided Actions enable you to customize comprehensive optimization sequences including compression, metadata removal, and file size management, ensuring uniform processing across different PDF documents. Select the specific optimization parameters you previously configured manually such as image compression levels, font subsetting, and transparency handling. Configure the workflow to apply these settings automatically to single or multiple files, saving significant time in repetitive document preparation tasks.
Remember that while the Action Wizard provides robust automation, each workflow must be initiated manually on the same machine for security reasons. Test your automated workflow thoroughly with sample documents to verify consistent performance and quality across different file types and sizes.
Pro tip: Periodically review and update your automation workflows to incorporate new optimization techniques and adapt to changing document requirements.
Enhance Your PDF Optimization Workflow with Mapsoft Solutions
If you are aiming to master Adobe Acrobat Pro’s PDF optimization but find balancing file size and document quality challenging, Mapsoft offers advanced tools tailored just for that. The article highlights key pain points like managing high-resolution images, font embedding, and transparency that cause file bloat. At Mapsoft, we understand these hurdles and provide specialized solutions to automate and streamline PDF compression, editing, and workflow management.

Explore our Digital Preservation offerings to safeguard your optimized files and improve document longevity. With Mapsoft’s PDF Hub and custom plugins, you can easily compress, secure, and manipulate your PDFs at scale, ensuring your documents remain high-quality without sacrificing performance. Visit Mapsoft.com today and transform your PDF workflows with professional-grade tools designed to save time and optimize results.
Frequently Asked Questions
How can I reduce the file size of my PDF using Adobe Acrobat Pro?
To reduce the file size of your PDF, open the document in Adobe Acrobat Pro and navigate to the ‘Compress a PDF’ option. Adjust the image settings and remove unnecessary metadata to target a reduction of up to 50% without significantly impacting quality.
What should I check before optimizing a PDF?
Before optimizing your PDF, conduct a thorough audit of large images, unnecessary embedded fonts, and metadata that inflate file size. Focus on identifying and removing these elements to maintain document quality while decreasing size significantly.
How do I ensure the quality of my PDF after optimization?
To ensure quality after optimization, compare the original and optimized versions side by side. Use Adobe Acrobat’s preview tools to check for any visual clarity issues, especially in images and text resolution, before finalizing your changes.
What are the best settings for compressing images in my PDF?
The best settings for compressing images in your PDF include using downsampling and selecting a compression type like JPEG at a quality level that maintains clarity. Adjust these settings in the Advanced Optimization panel to achieve a good balance between size and quality.
Can I automate the PDF optimization process in Adobe Acrobat Pro?
Yes, you can automate the PDF optimization process by using the Action Wizard in Adobe Acrobat Pro. Set custom sequences for repeated optimization tasks to save time on multiple documents, ensuring consistency across your workflows.
How do I create a backup before optimizing my PDF?
To create a backup before optimizing your PDF, simply save a copy of your original document with a different filename. This ensures that you have access to the unoptimized version if needed for future reference or comparison.

