
PDF documents are widely used for sharing and distributing various types of content. One useful feature of PDFs is the ability to set page labels in pdfs that have multiple pages, which can help organize and navigate through the document more efficiently. In this blog post, we will explore how to set page labels in Adobe Acrobat, one of the most popular PDF editing tools.
Page labels are essentially a way to assign user-friendly names or numbers to pages or page ranges in a PDF document. This can be particularly helpful when dealing with lengthy documents or those that contain multiple sections. Instead of relying solely on page numbers, page labels provide a more descriptive and intuitive way to refer to specific pages.
To set page labels in Acrobat, follow these simple steps:
1. Open the PDF document in Acrobat: Launch Adobe Acrobat and open the PDF file you want to work with.
2. Access the Page Thumbnails panel: Click on the “Pages” tab on the left-hand side of the Acrobat window to open the Page Thumbnails panel. This panel displays a miniature version of each page in the document.
3. Right-click on the page you want to label: Locate the page you wish to assign a label to in the Page Thumbnails panel. Right-click on the thumbnail image of the page to open a context menu.
4. Select “Page Labels” from the context menu: In the context menu, hover over the “Page Labels” option. This will reveal a submenu with various options related to page labels.
5. Choose the desired page label option: In the submenu, you can select from several options for setting the page label. These options include “None,” “Roman Numerals,” “Decimal,” and “Custom.” Choose the option that best suits your needs.
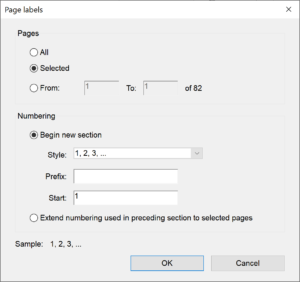
6. Customize the page label: If you selected the “Custom” option, a dialog box will appear where you can enter your desired page label. You can specify the starting number, the style (numeric, alphabetic, or roman), and any prefix or suffix you want to include.
7. Apply the page label: Once you have chosen or customized the page label, click the “OK” button to apply it to the selected page. The page label will now be displayed in the Page Thumbnails panel and can be seen when navigating through the document.
8. Repeat the process for other pages (optional): If you want to set page labels for multiple pages, simply repeat steps 3 to 7 for each page you wish to label.
Setting page labels in Acrobat can greatly enhance the usability and organization of your PDF documents. Whether you’re dealing with a lengthy report, a complex manual, or a multi-chapter book, page labels make it easier to locate specific pages and sections.
In addition to assigning labels to individual pages, Acrobat also allows you to set page ranges with different labels. This can be useful when you have sections within your document that require their own numbering system. Simply select the desired page range in the Page Thumbnails panel and follow the same steps outlined above to set the appropriate page labels.
By utilizing page labels in Acrobat, you can create more user-friendly and intuitive PDF documents. Whether you’re a student, professional, or casual user, this feature can greatly improve your overall PDF reading and navigation experience.
In conclusion, setting page labels in Adobe Acrobat is a straightforward process that can help you better organize and navigate through your PDF documents. By following the steps outlined in this blog post, you can easily assign descriptive labels or numbers to individual pages, making it easier to locate specific content within the document.
Associated Links:
Create Table Of Contents PDF Adobe Acrobat Plugin Tool

