PDF Structure: How PDF Files Are Built
A practical explanation of the header, body objects, cross-reference data, trailer, streams, pages, fonts, and images inside a PDF file.
PDF structure is the internal layout of a PDF file: a header identifies the PDF version, the body stores numbered objects such as pages and fonts, cross-reference data tells readers where those objects are, and the trailer points to the document catalog. Understanding those parts makes it easier to debug, repair, optimise, or generate PDFs.
You can also analyse PDF structure, set PDF open options, or convert PDF to HTML online for free using Mapsoft's PDF Hub — no installation required.
Introduction
PDF (Portable Document Format) files, as defined in the ISO 32000 specification, may appear simple to the end user, but beneath the surface they have a sophisticated internal structure. Understanding how a PDF file is organised is valuable for developers, publishing professionals, and anyone who works closely with document technology. This article provides a summary of the key structural components that make up a PDF file.
The Four Major Sections of a PDF File
Every PDF file is composed of four main sections, each serving a distinct purpose:
- Header
- Body
- Cross-Reference Table
- Trailer
1. The Header
The header is the first line of a PDF file and identifies the file as a PDF along with the version of the specification it conforms to. A typical header looks like this:
%PDF-1.7
This tells the reading application that the file follows PDF version 1.7. The header may also be followed by a comment line containing binary characters, which signals to file transfer programs that the file contains binary data and should not be treated as plain text.
2. The Body
The body is the largest section of a PDF file and contains all the objects that make up the document's content. These objects include:
- Pages: Each page in the document is represented by a page object that defines the page's dimensions, content streams, and associated resources.
- Text: Text content is encoded within content streams using PDF operators. Fonts, sizes, positions, and rendering modes are specified separately from the character data itself.
- Images: Raster images are stored as image XObjects, which can be compressed using various methods such as JPEG, JPEG 2000, CCITT, or Flate compression.
- Vector Graphics: Lines, curves, and shapes are described using path construction and painting operators within content streams.
- Fonts: Font resources define the typefaces used in the document. Fonts can be embedded (partially or fully) within the PDF to ensure consistent rendering.
- Annotations: Interactive elements such as links, comments, form fields, and multimedia annotations are stored as annotation objects associated with specific pages.
- Bookmarks: The document outline (bookmark tree) provides a hierarchical table of contents for navigation.
- Metadata: Document information such as title, author, creation date, and modification date, as well as XMP metadata streams.
PDF Objects
All data in the body is represented using PDF's eight basic object types:
- Boolean values:
trueorfalse. - Integer and real numbers: Such as
42or3.14. - Strings: Literal strings enclosed in parentheses
(Hello World)or hexadecimal strings enclosed in angle brackets<48656C6C6F>. - Names: Unique identifiers preceded by a forward slash, such as
/Typeor/Font. - Arrays: Ordered collections of objects enclosed in square brackets
[1 2 3]. - Dictionaries: Collections of key-value pairs enclosed in double angle brackets
<< /Key /Value >>. - Streams: Sequences of bytes, typically used for page content, images, and embedded fonts. Streams consist of a dictionary followed by the keyword
stream, the data, and the keywordendstream. - The null object: Represents the absence of a value.
Objects in the body are typically defined as indirect objects, each with a unique object number and generation number. This allows other parts of the file to reference them. For example:
5 0 obj << /Type /Page /Parent 3 0 R /MediaBox [0 0 612 792] >> endobj
Here, 5 0 obj identifies this as object number 5 with generation number 0, and 3 0 R is a reference to indirect object number 3.
3. The Cross-Reference Table
The cross-reference table (often called the xref table) provides a lookup mechanism for finding every indirect object in the file. It records the byte offset of each object from the beginning of the file, enabling random access to any object without reading the entire document sequentially.
A typical cross-reference table begins with the keyword xref and lists entries in the format:
0000000000 65535 f (a free object entry)
0000000017 00000 n (an in-use object at byte offset 17)
In PDF 1.5 and later (see the PDF specification), the cross-reference table can also be stored as a cross-reference stream, which is a compressed form that reduces file size.
4. The Trailer
The trailer is located at the end of the file and provides the information needed to begin reading the PDF. It contains:
- A reference to the root object (the document catalogue), which is the entry point into the document's object hierarchy.
- A reference to the Info dictionary (document metadata) if present.
- The size of the cross-reference table (total number of entries).
- An optional reference to a previous cross-reference table if the file has been incrementally updated.
- An optional ID array for file identification.
The very last line of a PDF file is %%EOF, the end-of-file marker. Immediately before this is the startxref keyword followed by the byte offset of the cross-reference table, which tells the reader where to begin parsing.
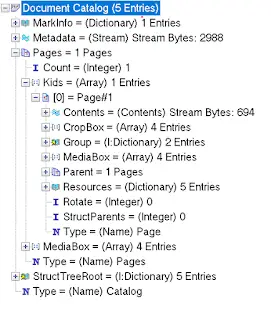
The Document Catalogue and Page Tree
The root of a PDF's logical structure is the document catalogue, referenced from the trailer. The catalogue provides access to all major document features, including:
- The page tree (the hierarchy of pages in the document).
- The document outline (bookmarks).
- Named destinations.
- Interactive form fields (AcroForm).
- Document-level JavaScript.
- Metadata streams.
The page tree is a balanced tree structure that organises the document's pages. Rather than listing every page in a flat array, the page tree uses intermediate nodes to group pages, which allows efficient access even in documents with thousands of pages.
Content Streams and Operators
The visual content of each page is defined in one or more content streams. These streams contain sequences of PDF operators that describe how to render text, draw graphics, and place images. Common operators include:
BT/ET— Begin and end a text block.Tf— Set the font and size.Tj— Show a text string.m,l,c— Move to, line to, and curve to (path construction).S,f— Stroke and fill paths.Do— Paint an external object (XObject) such as an image or form.q/Q— Save and restore the graphics state.cm— Apply a coordinate transformation matrix.
Incremental Updates
One of PDF's important design features is support for incremental updates. When a PDF is modified (for example, when a user adds an annotation or fills in a form field), the changes can be appended to the end of the file rather than rewriting the entire document. Each incremental update adds a new body section, cross-reference table, and trailer. This approach preserves the original content and makes saving changes fast, even for large files.
Compression and Filters
PDF supports various compression methods (called filters) to reduce file size. Streams can be compressed using one or more filters, including:
- FlateDecode: General-purpose compression based on the zlib/deflate algorithm. This is the most commonly used filter.
- DCTDecode: JPEG compression for photographic images.
- JPXDecode: JPEG 2000 compression (available from PDF 1.5).
- CCITTFaxDecode: Fax-style compression optimised for monochrome images.
- JBIG2Decode: Advanced compression for bi-level images (available from PDF 1.4).
- LZWDecode: LZW compression (less common in modern PDFs).
- RunLengthDecode: Simple run-length encoding.
- ASCIIHexDecode / ASCII85Decode: Encoding filters for representing binary data as ASCII text.
Conclusion
The structure of a PDF file is carefully designed to balance human readability (at least at the syntax level), efficient random access, and the ability to represent complex documents faithfully. From the simple header through to the trailer, every component plays a role in ensuring that PDF documents can be created, viewed, and processed reliably across different platforms and over long periods of time. Understanding this structure is essential for anyone developing PDF tools, working with document automation, or troubleshooting PDF-related issues.
Related Articles
What is PDF? The Portable Document Format Explained
A clear explanation of what PDF is, why it was created, how it works, and why it remains the world's most widely used document format.
Evolution of the PDF Format: A Historical Perspective
Explore the birth and impact of the PDF format. Learn how Adobe Acrobat shaped its growth, discover features and advantages of PDF, including document integrity and security.
Exploring the PDF Format Specification
Stay up-to-date with the latest PDF format spec updates. Discover the second collection of errata for PDF 2.0, featuring 265 corrections for enhanced interoperability.
Need Help Working with PDFs?
Mapsoft offers professional PDF tools and expert consultancy services to help you get the most from your documents. You can also explore and analyse PDF files for free using our online PDF Hub.